Unlock Precision with Aircraft CAD/Ordinate Data

Unlock Precision with Aircraft CAD/Ordinate Data:

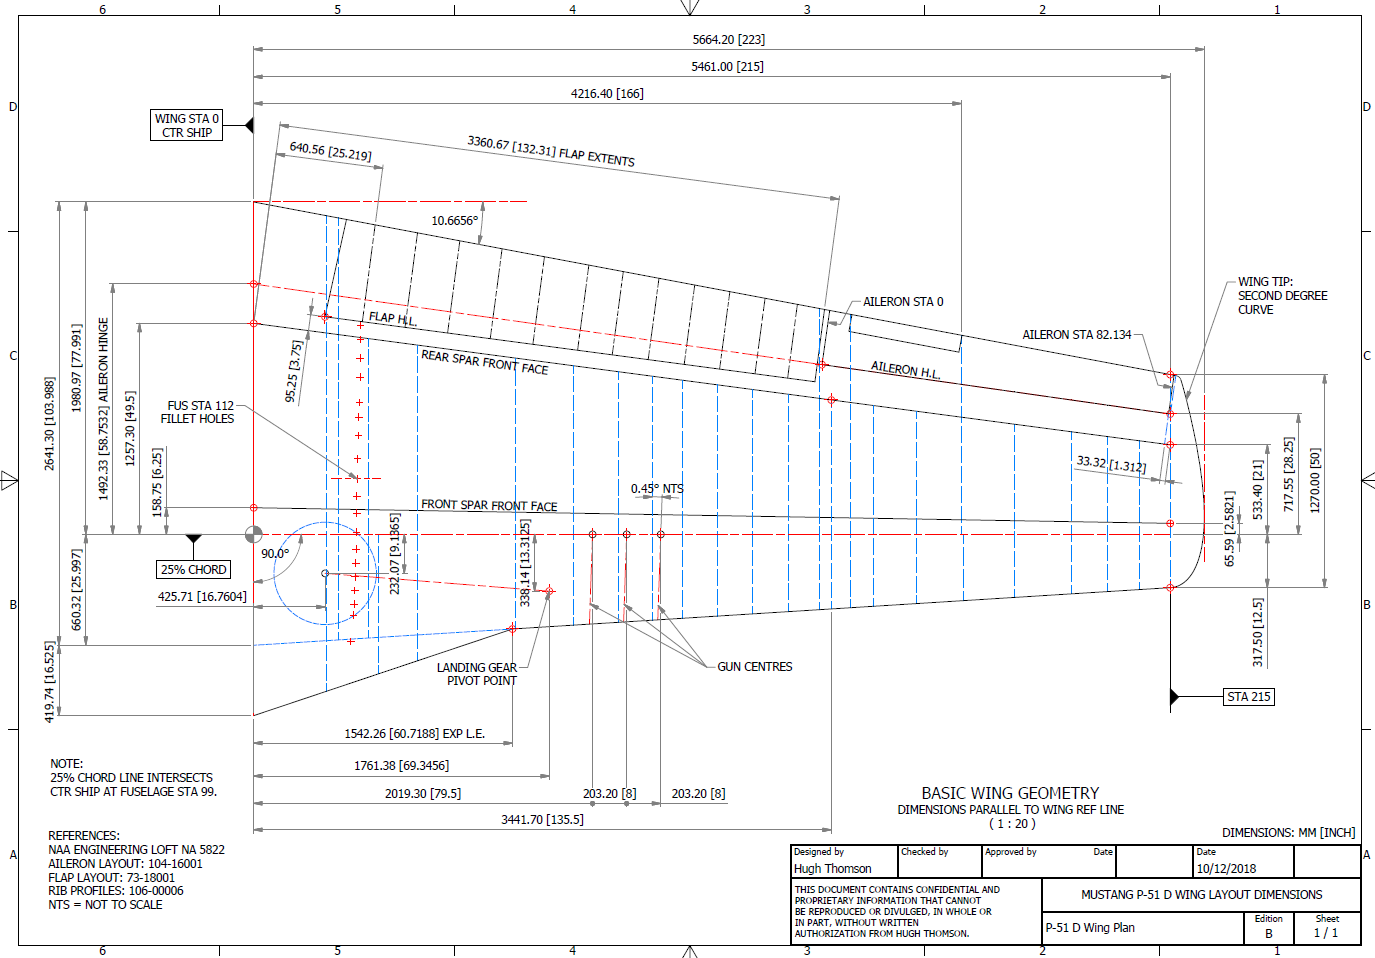
The CAD/Ordinate datasets are designed to offer detailed documentation of the dimensional information pertaining to the core profiles of various aircraft components. This includes elements such as fuselage bulkheads, cowls, vertical stabilizers, horizontal stabilizers, wings, rudders, flaps, ailerons, and elevators. Essentially, these datasets provide all the dimensional information needed to develop the main profiles for aircraft construction.

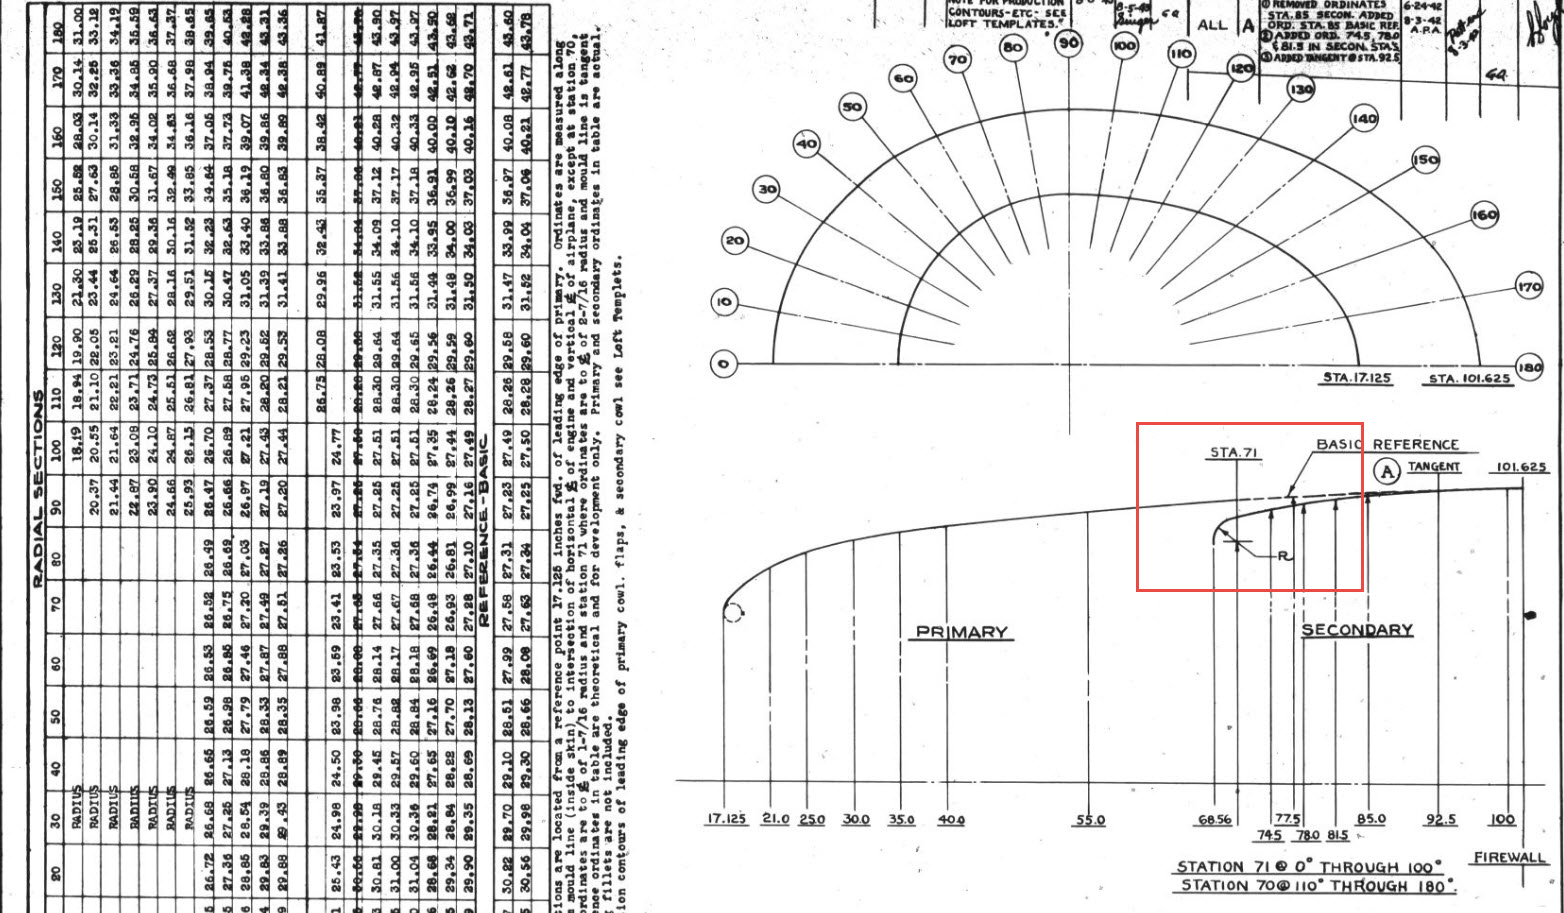
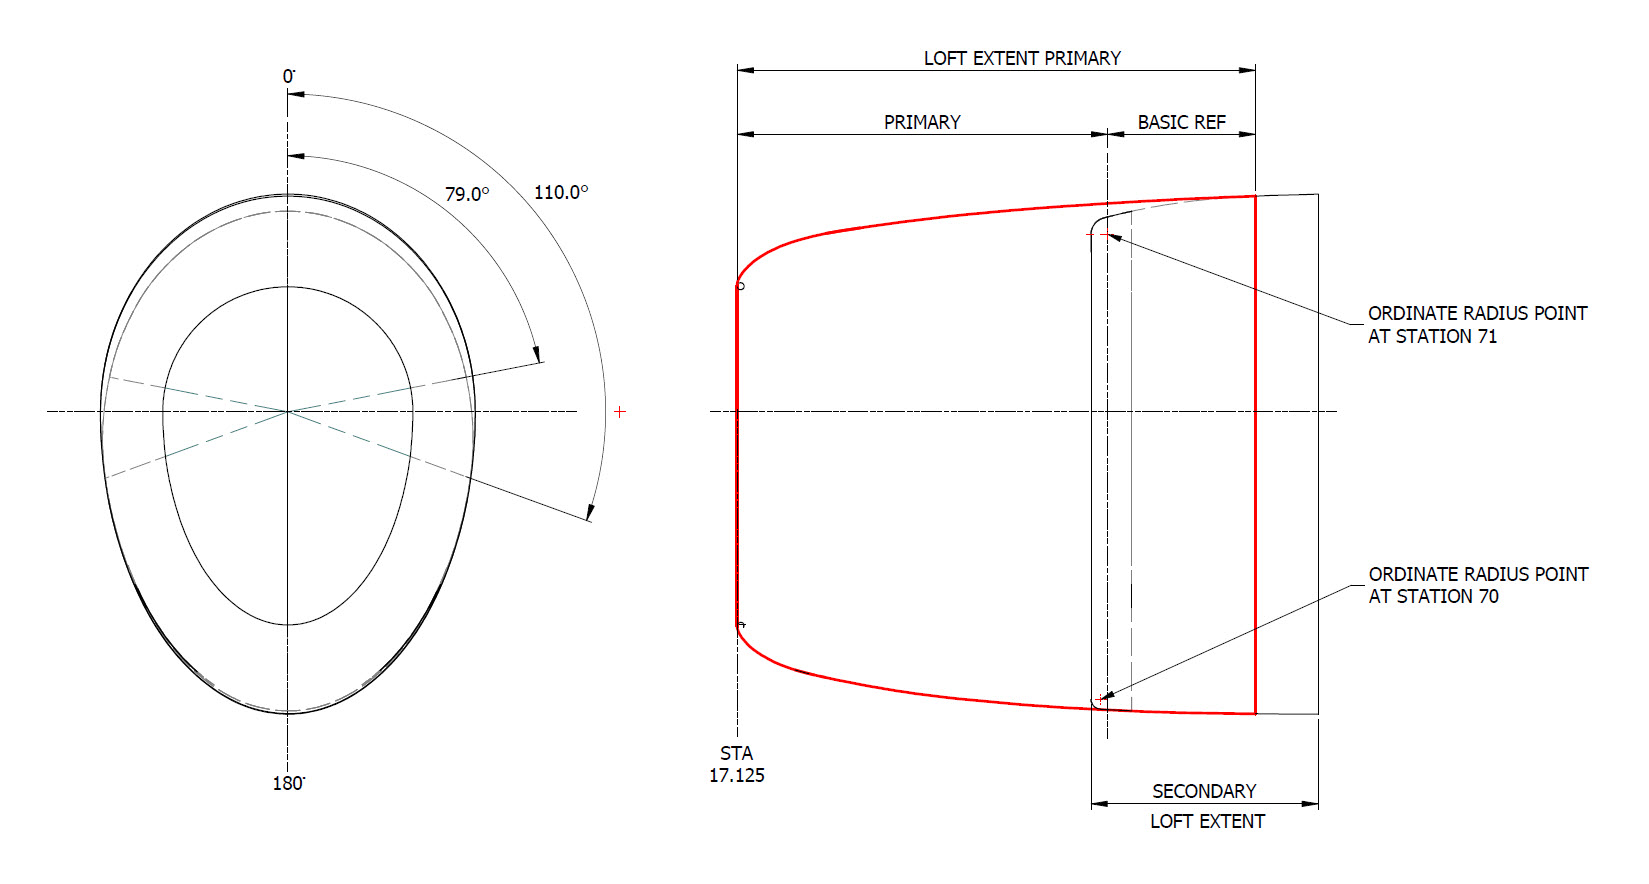
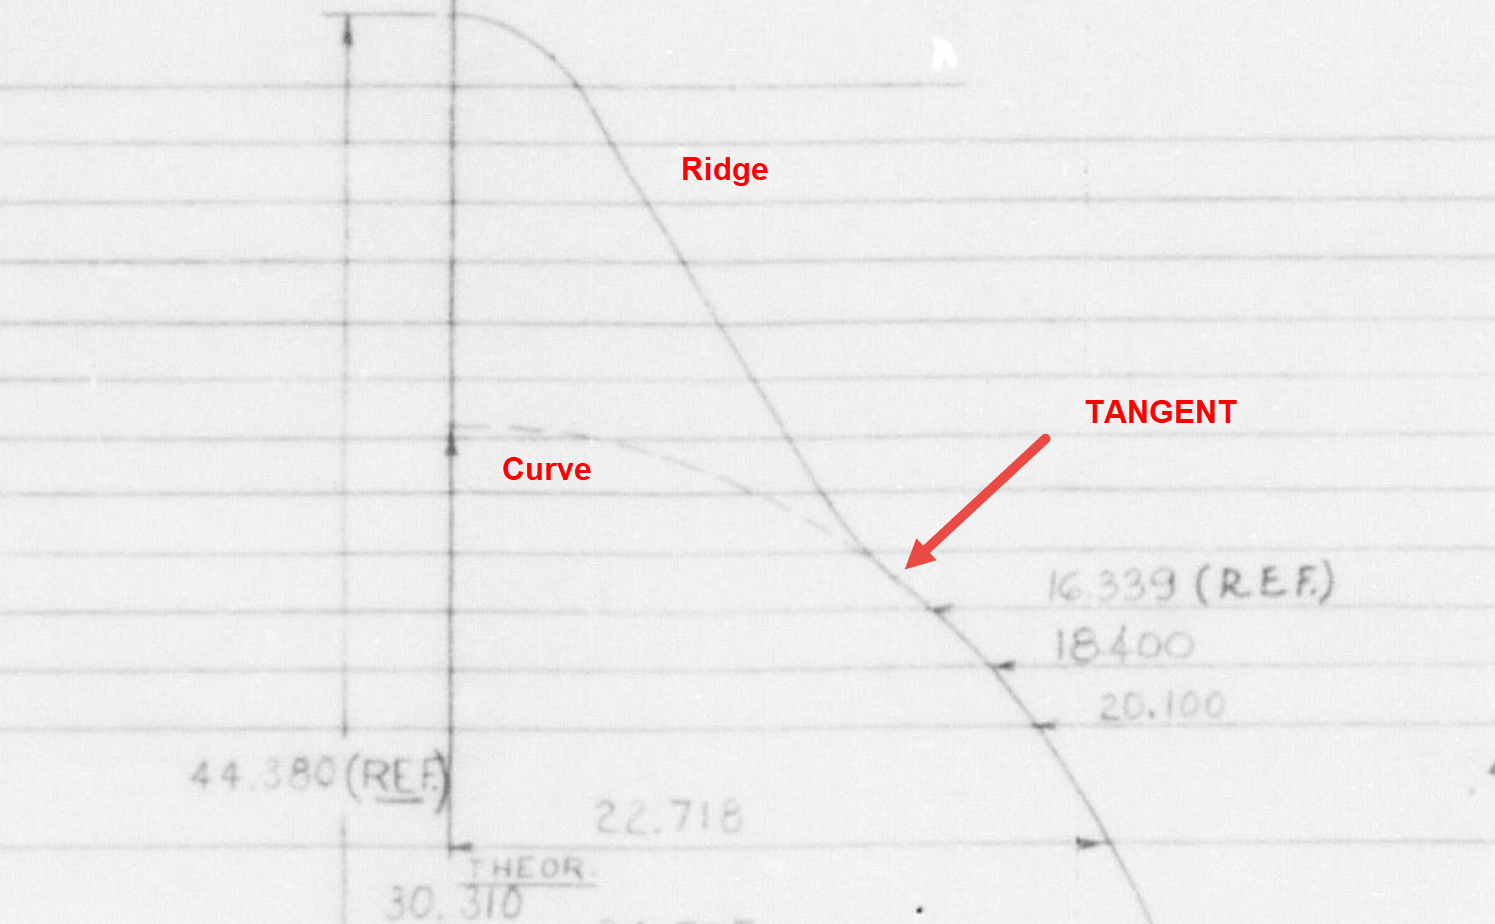
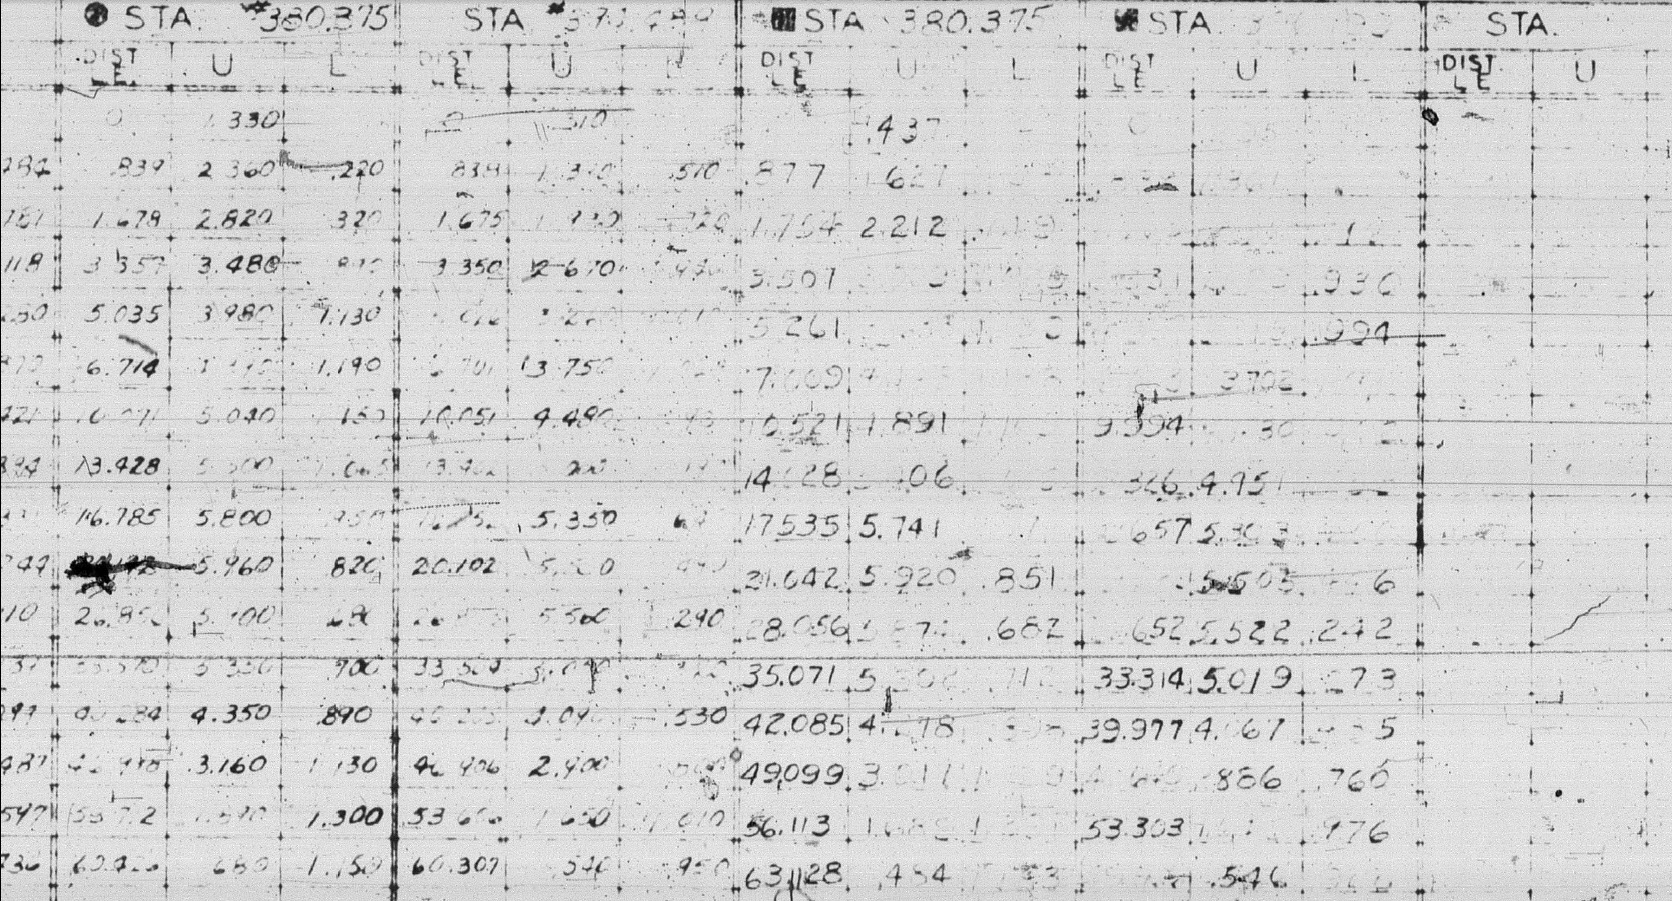
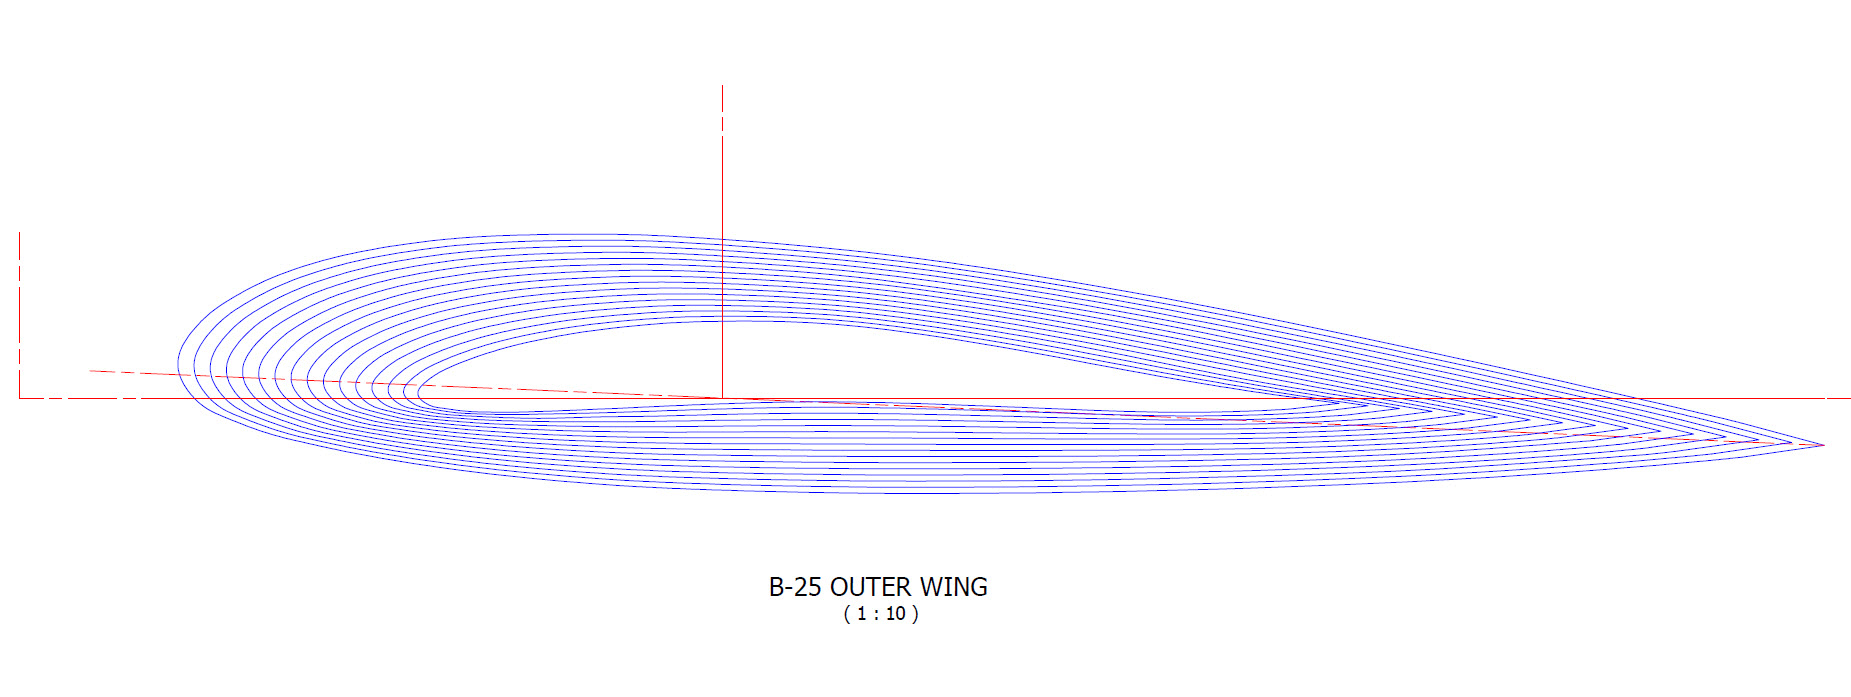
The research studies were conducted to fill in important gaps in information and to clarify unclear details. Often, data on blueprints can be difficult to read, making it necessary to record and analyze the bulkhead or rib profiles in CAD. This process helps accurately determine the correct dimensions.

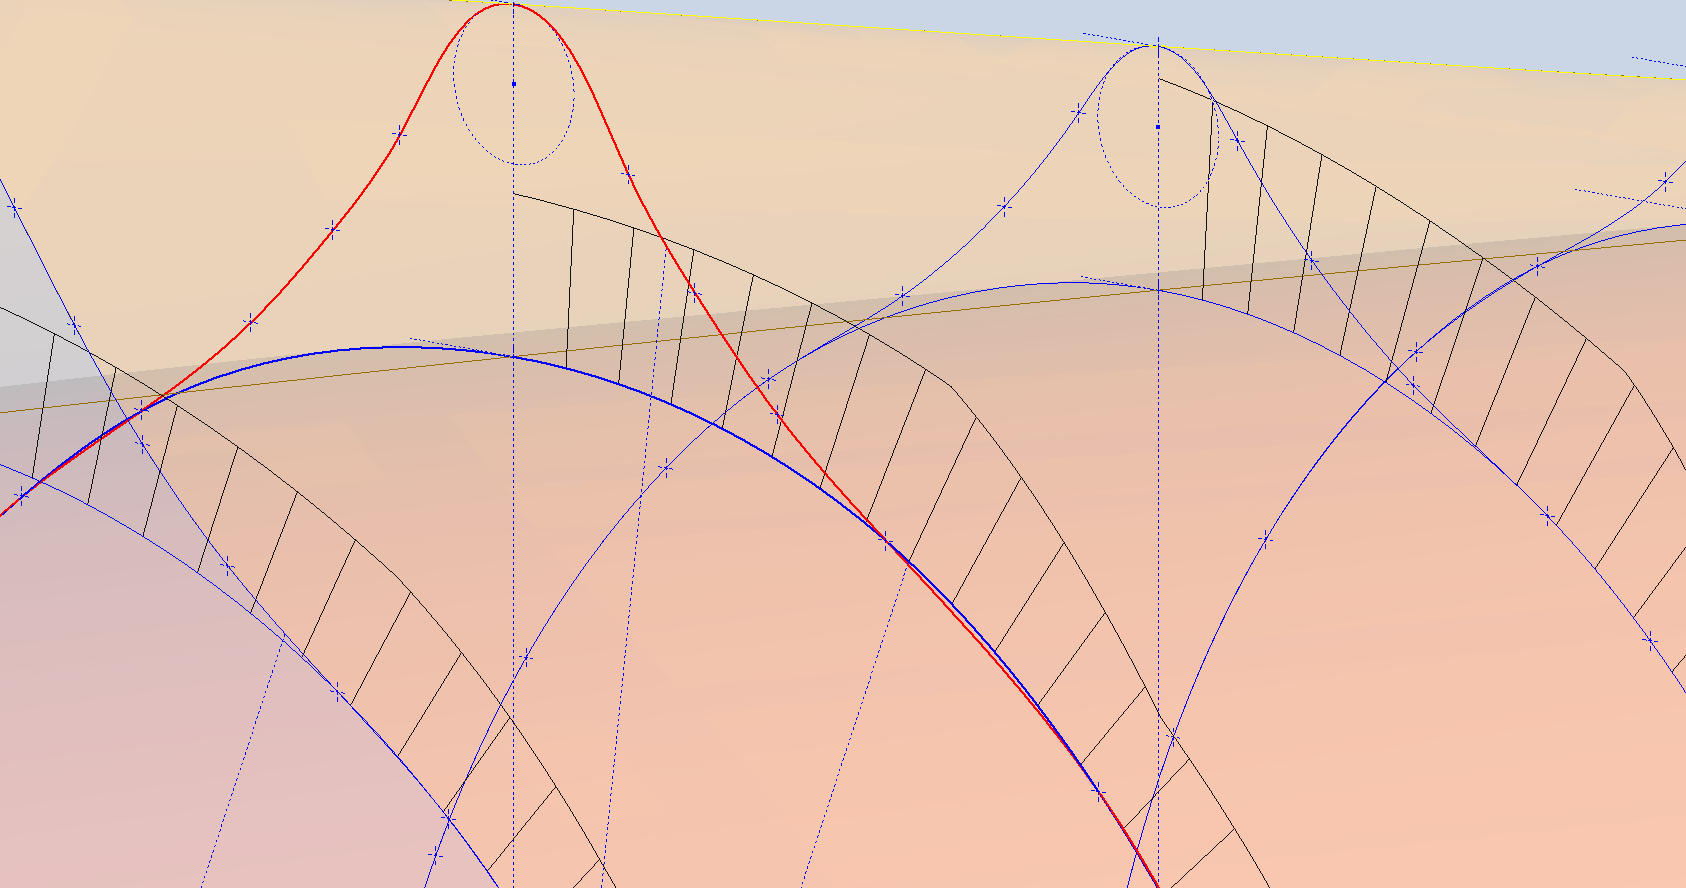
The examples of ordinate dimensions above are not necessarily the worst; in fact, there are truly poor examples that exist. To tackle these issues, we should start by recording the known dimensions in Excel and making educated guesses about the worst examples. Next, we can create each profile in CAD. This CAD profile will give us a clear visual representation of any anomalies in the curvature, which can be further analyzed through curvature analysis to identify low and high spots. This process is done for every rib and bulkhead profile where we have ordinate dimensions.

The spreadsheets above are typical examples of CAD/Ordinate datasets. The first spreadsheet contains the Ordinate record for the P-38, while the second one features the Aileron sheet for the FM2. You may notice a Linear Regression analysis table included in the FM2 sheet. Initially, determining the individual profiles of the ribs or bulkheads is just the first step; we now need to assess the assembly of all these components and check for proper alignment.

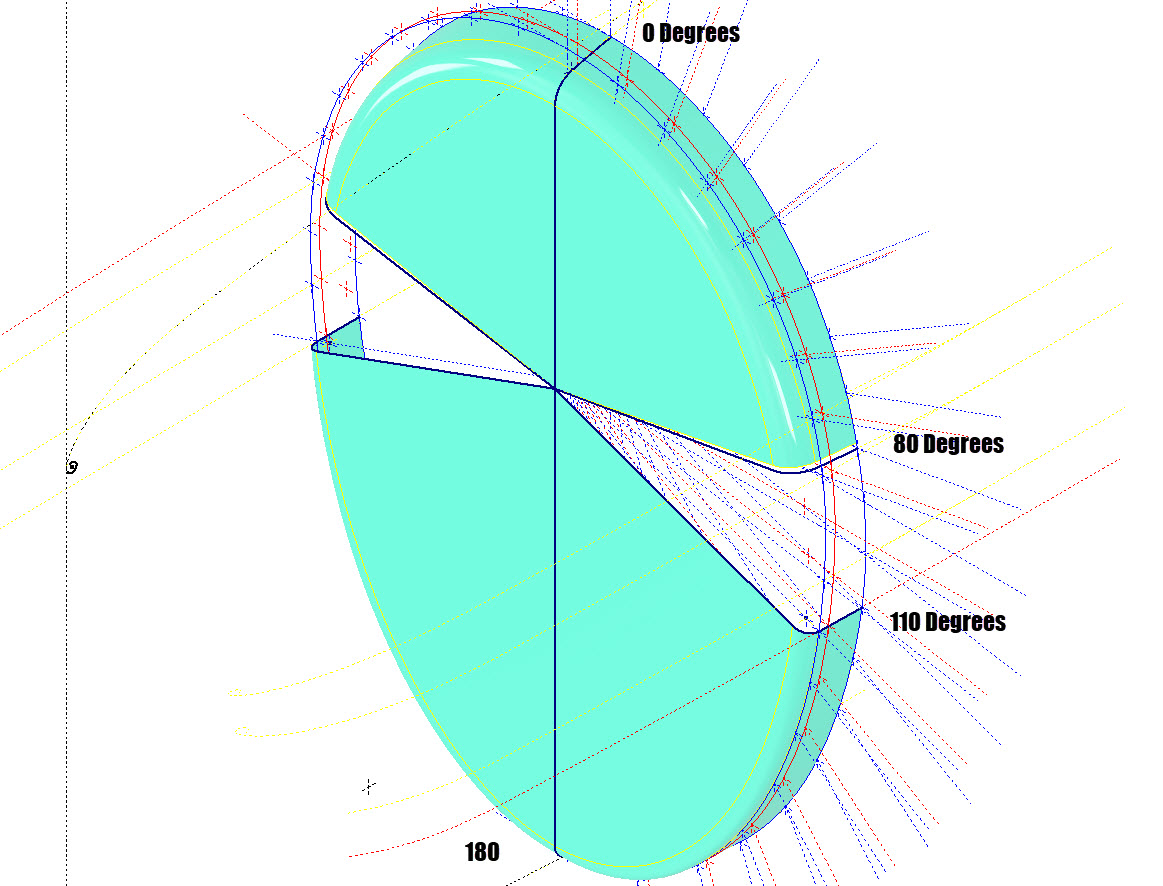
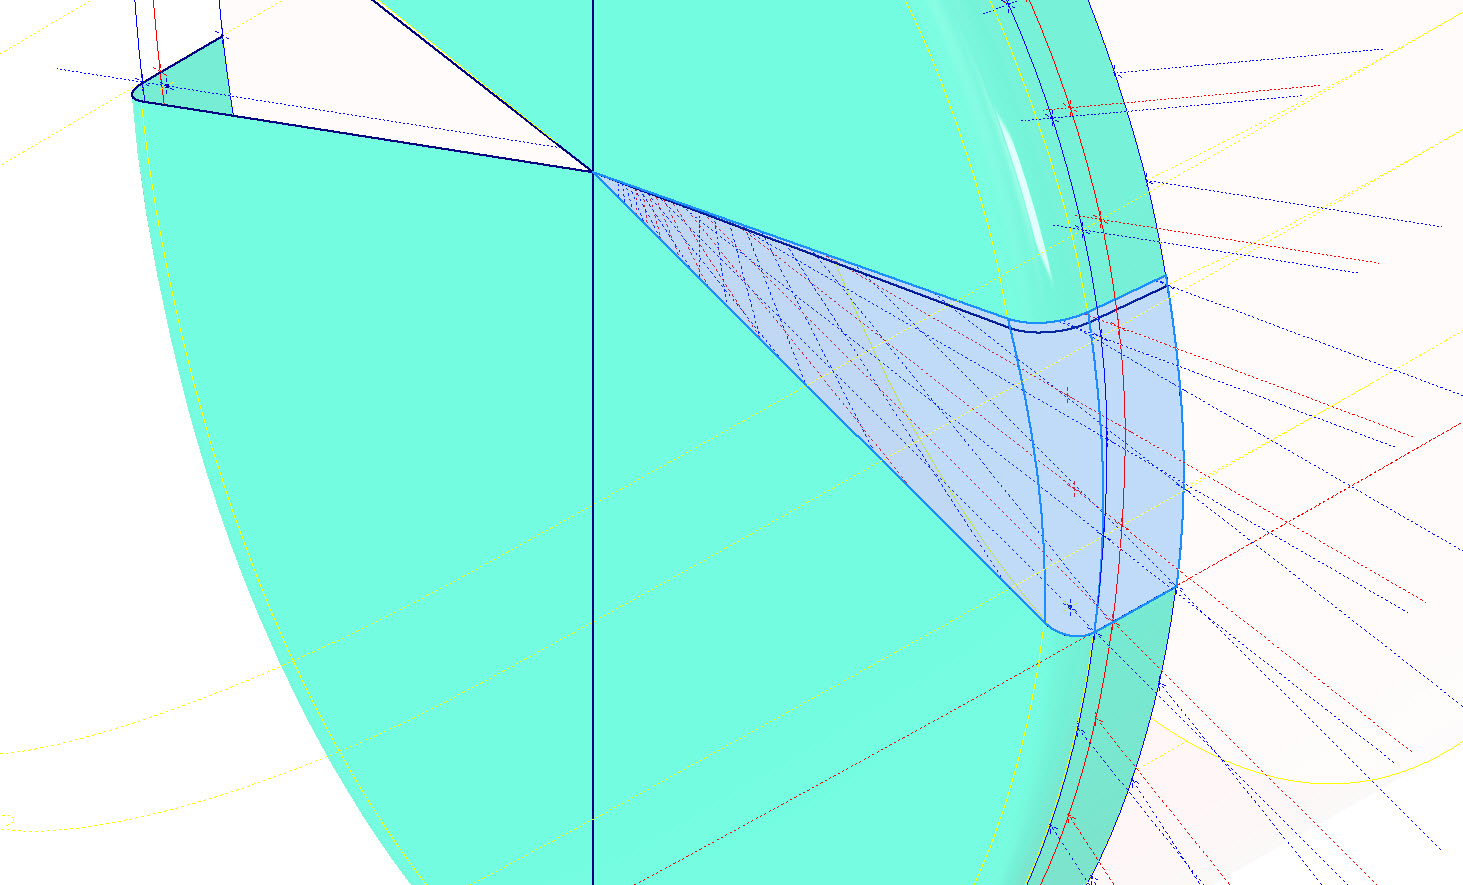
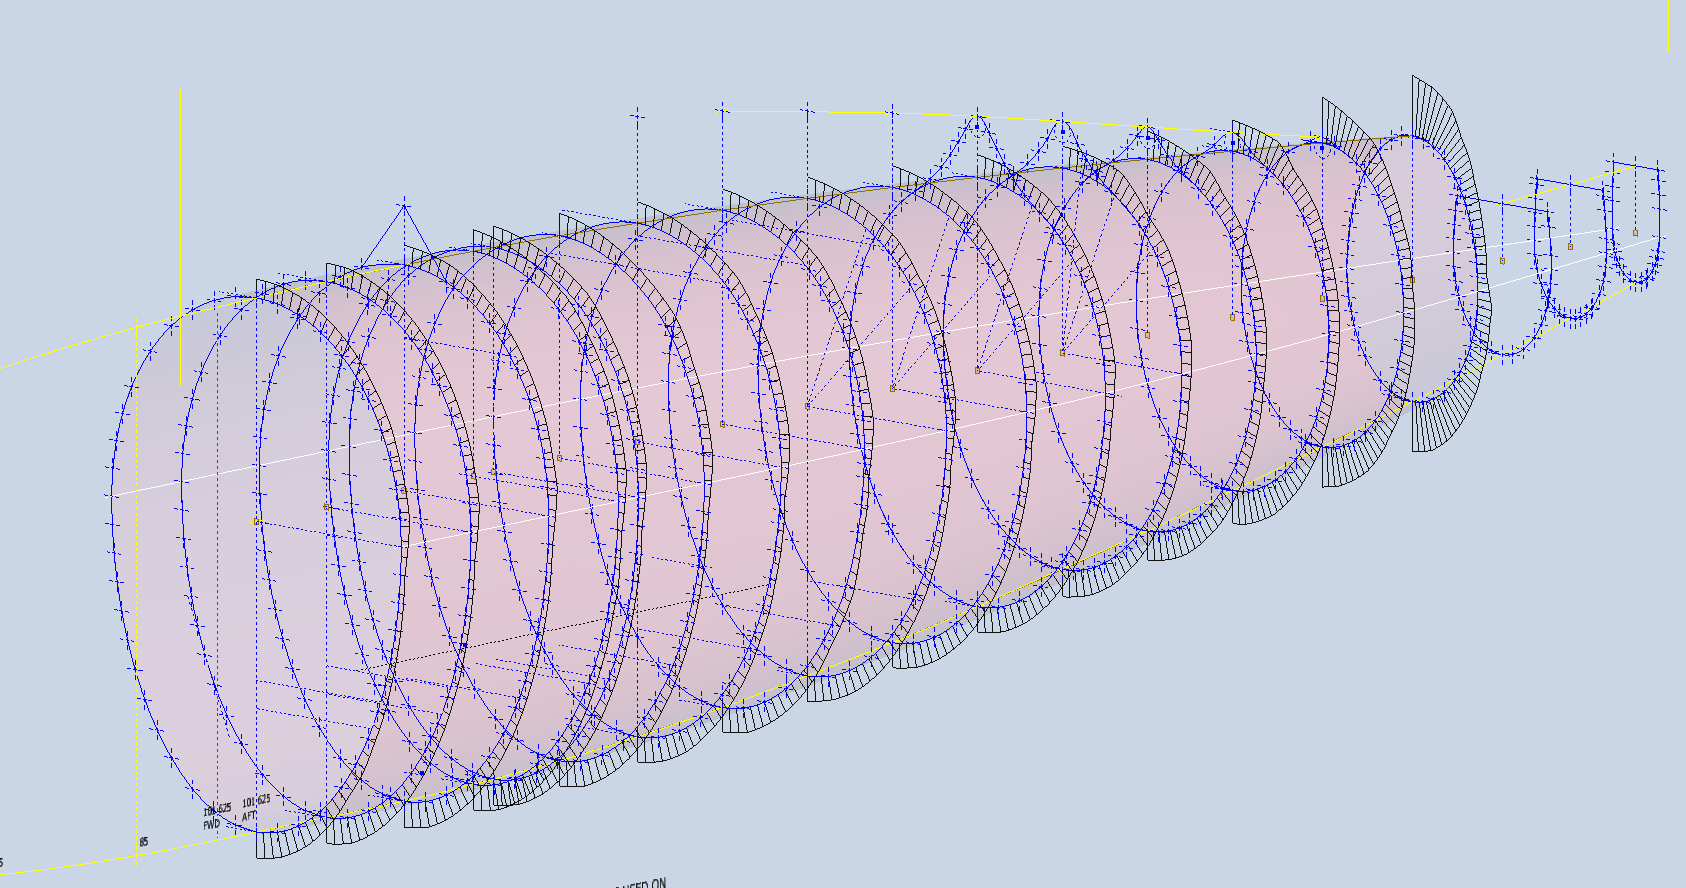
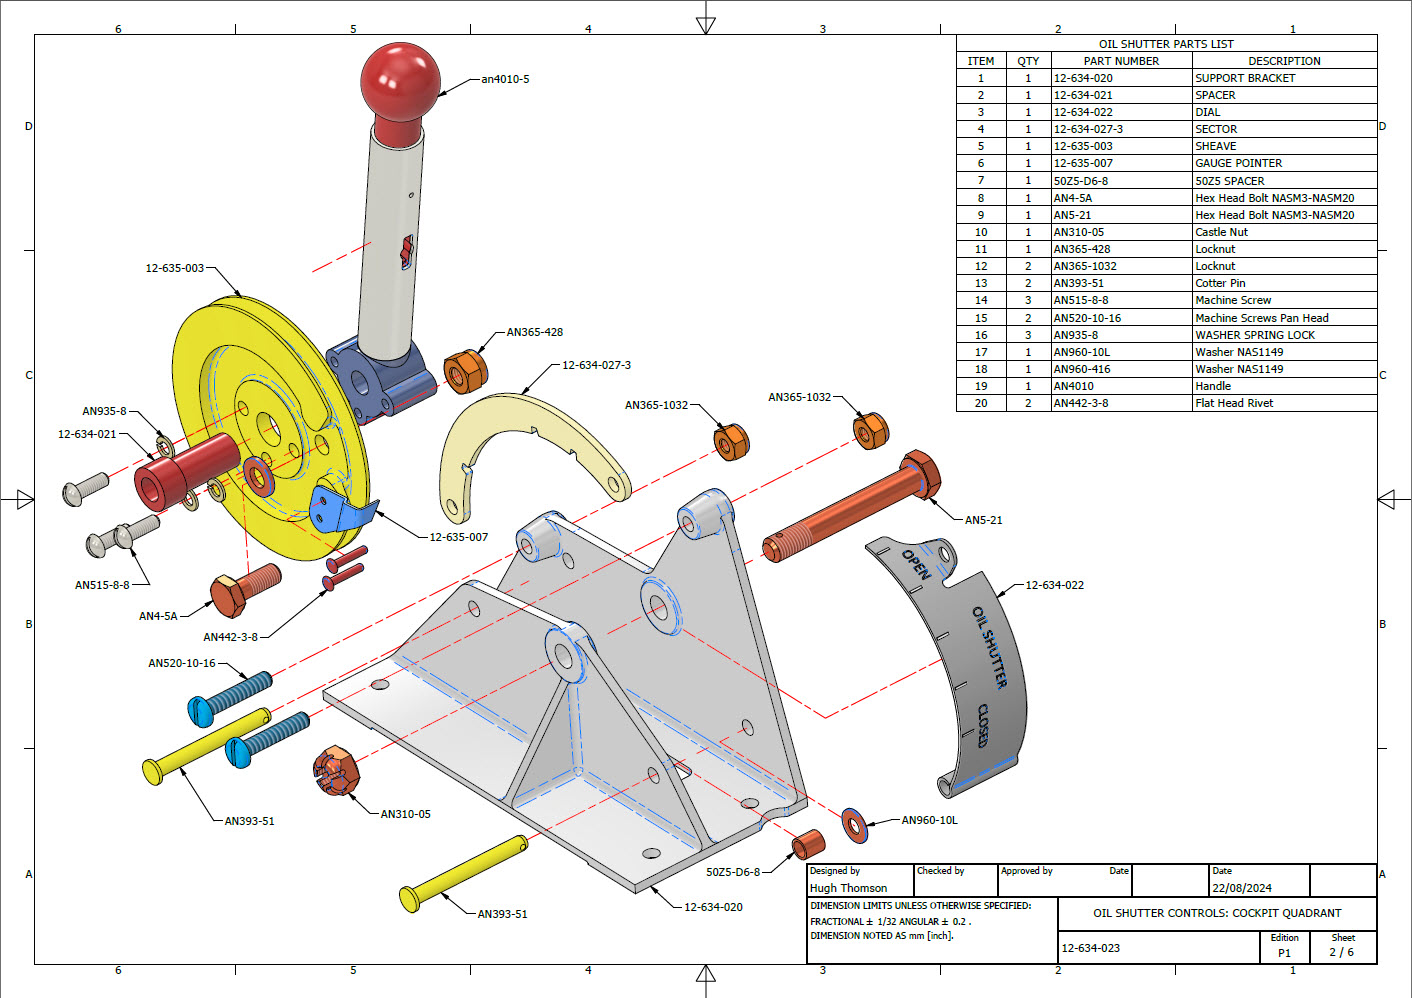
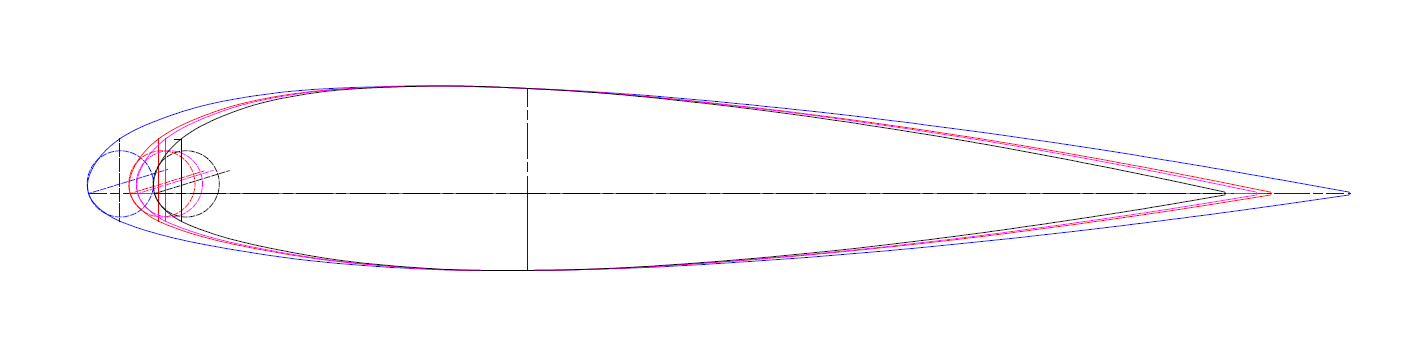
Each drawn sketch profile in CAD will serve as the border for containing a surface patch.

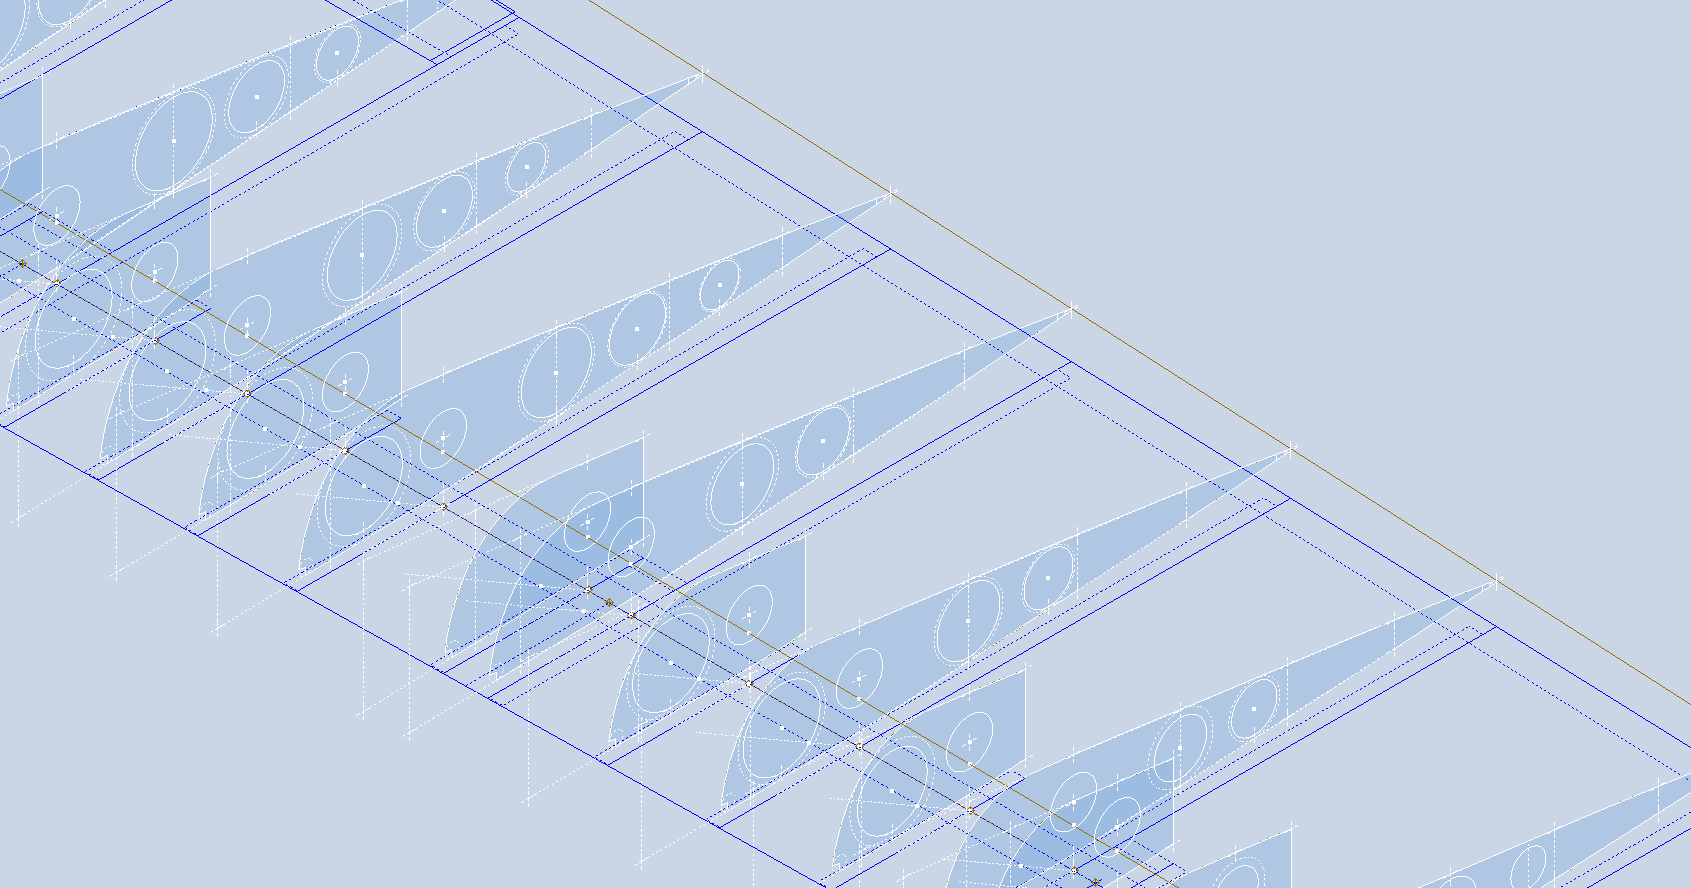
There are two primary reasons for doing this. First, it provides us with a plane that can be converted into a working surface, which can be utilized in any CAD product. Secondly, it provides us with a tangible element that we use to check assembly cross sections at key locations for alignment checks.

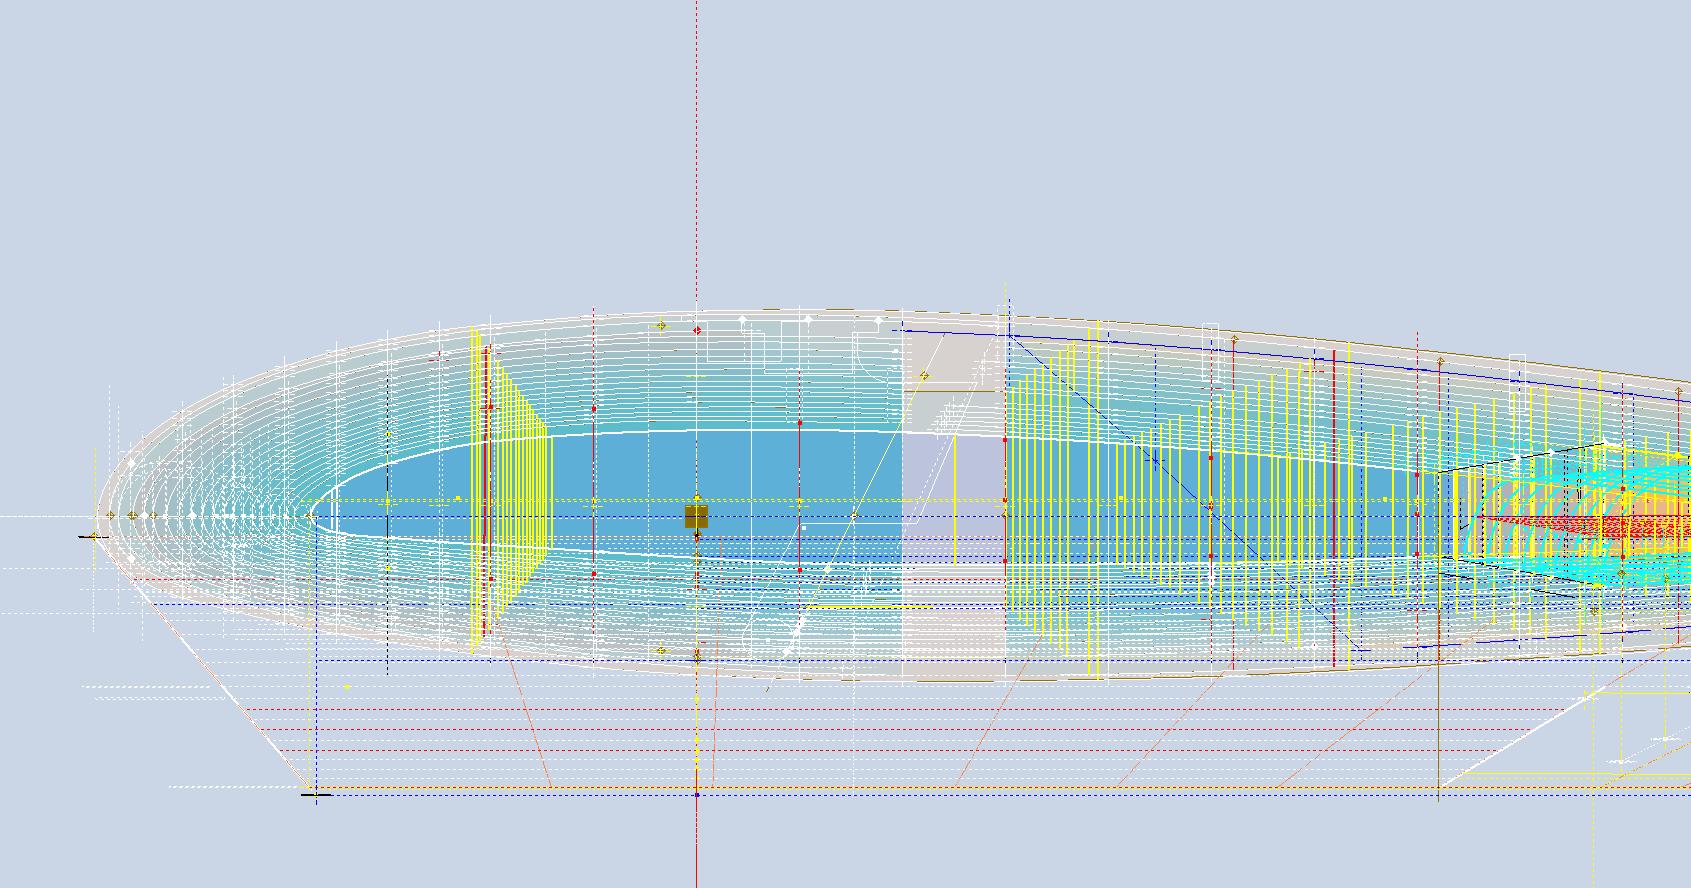
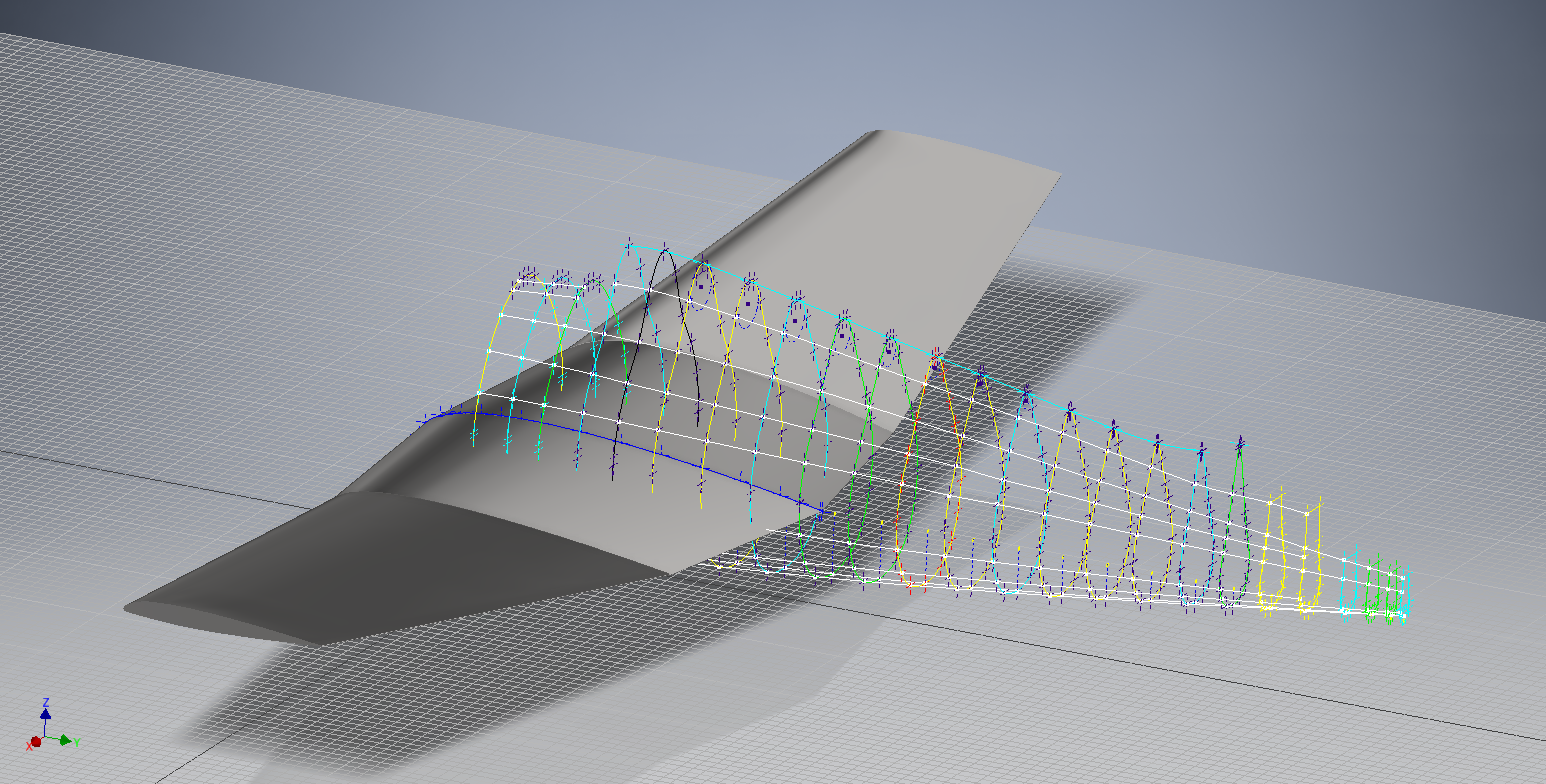
For example, consider the wing of the FM2. The wing assembly has been converted into a part file, and cross-section sketches were created at various chord locations: 30%, 60%, 70%, and 80%. Each sketch utilized the “Project Cut Edges” function to generate a cross-section of each rib. As shown in the second image, the array of lines representing the rib cross-sections provides a visual aid to identify high and low spots on the wing assembly. By creating a surface plane for each rib, we were able to generate these cross sections effectively. There were a few high and low points, which were double-checked and rectified.

If we require additional verification and strive for precision, we could use Excel’s Linear Regression to generate the coordinates for a Best Fit Line and make adjustments as needed. However, this approach may be excessive since our primary goal is to clarify the original blueprint data and apply it to identify appropriate rib and bulkhead profiles within acceptable parameters.

We can also use Linear Regression to give us an overview of how the ordinate profiles align with one another and to identify any discrepancies. Typically, acceptable parameters are within +/- 0.01 inches (or 0.254 mm), as specified by the dimensions on the blueprints, which usually only provide accuracy to two decimal places. Sometimes, as was the case with the P-51 and P-38, we had key design parameters that allowed us to calculate the exact profiles for each wing.

Validating dimensional data is crucial because the actual wing construction may not always match the accepted specifications. The design specifications for the FM2 call for a NACA 23015 airfoil at the root and a NACA 23009 airfoil at the tip. You might be surprised to learn that the NACA 23009 is a modified version of the standard 23009. Nothing is therefore assumed or taken for granted.

The CAD/Ordinate datasets are the result of extensive and thorough research and analysis, often taking many months of work, sometimes around the clock. These spreadsheets include every known ordinate dimension for various aircraft, gathered not only from blueprints but also from manuals, reports, and even correspondence. The CAD/Ordinate packages also include various 3D CAD models in various formats, including 3D DWG and fully dimensioned 2D DWG. All documents provided are fully editable so you can adapt the information to your work processes.

For more details on using the Ordinate spreadsheet data for your own CAD systems, see my earlier post here: Ordinate Overview

With over 45 years of experience in structural and mechanical engineering, my expertise influences everything I do.

In summary, the purpose of the CAD/ordinate datasets is the result of intensive work and research to provide the user with correct usable data that can be utilized in any CAD system.

When you buy CAD/Ordinate datasets and Blueprint collections from me, you support my ongoing research to provide the most comprehensive and probably the most accurate dimensional information about various aircraft. This blog and my research work would not be possible without your support.

Technote: P-47 Cowl Ordinates

Technote: P-47 Cowl Ordinates:

The Ordinates for the P-47 Cowl are listed on Republic Drawing #89P63300 for P-47B, C and D. They differ from the usual ordinate dimensions that usually comprise X and Y coordinates in that they are radial ordinates. Essentially dimensions along a radial axis that are subdivided in 10-degree increments from 0 degrees to 180 degrees.

The ordinates as usual are extrapolated to a spreadsheets where I have also converted the radial ordinates into X,Y coordinates should this be required. The highlighted dimensions are the points on the inside face of the cowl skin. The dimensions at Stations 70 and 71, bordered in red, are to the centre of the secondary cowl leading edge radius at each degree increment. To be precise this is actually the profile for the Preheater.

The edge radius at the top of the Preheater is 2 7/16″ at Station 71 and 1 7/16″ at Station 70. On the Republic blueprint the radius of 2 7/16″ is applicable from 0 degrees to 100 degrees, and the radius of 1 7/16 ” is applicable from 110 degrees to 180 degrees. In the CAD drawing above, I have noted 79-degree and 110-degree intervals, and there is a reason for this.

At some point along this Preheater front edge, there is a transition from the 2 7/16″ radius to the 1 7/16″ radius. The republic blueprint for Preheater #89P621101 details the profile section that is applicable at 90 and 100 degrees showing the top radius at 2 7/16″ however it also notes an option where the radius fairs from 79 degrees to 110 degrees instead of 100 degrees to 110 degrees.

Personally, I prefer the latter as it ensures a smoother surface continuity. As you can see in the following image of a recent P-47 restoration they appear to have opted for the former which displays a noticeable bump from the 100 to 110-degree transition. The second image is the CAD interpretation of 79 to 110 degrees which is much smoother.

I have modeled only the main portion of the Preheater body surface; there is a projected curved section forward of this which I will model separately and again a good reason for doing this*.

If we look at the CAD development of the Preheater surface model you can see I have developed the top profile with an ordinate radius of 2 7/16″ to the 80 degree increment and the lower section ordinate radius 1 7/16″ from 110 to 180-degree increment. However, when you loft the 2 profiles you can see the default curvature transition is not continuous…what we want is for the curved section to have smooth continuity throughout the transition.

I should note that the surface was developed to the 80-degree increment and then trimmed back to 79 degrees; I already had the construction sketches in the model…just saves some work.

Inventor like other CAD software will attempt to interpret the desired surface loft but it does not always achieve the desired result. This is easily corrected by selecting transition points within the Loft dialog which will enable a smoother transition.

Going back to my earlier comment on the projected curved section*; as per comments above; the CAD-interpreted surface may not produce the desired result with more complex geometry. So often the best way of doing this is to model that section separately ensuring finer control over the finished surface.

CAD Tip: The vertical face of this developed surface is flat, occasionally when lofting, sweeps or even applying a surface patch it is always a good idea to check the finished surface is actually flat and planar where expected. The way to check that a surface is planar is to select the New Sketch option using the surface as a sketch plane…if the surface is planar it will allow a sketch.

P-47 Engine Mount:

On the Republic Drawing #89P62101 for the Engine Mount the intersection point of the top diagonal brace with the centre of the front ring is not clear.

On the Front View, we have either a dimension of 8.75″ (1) or an Angle of 58.5 degrees (2). To verify which is the correct set out for the top brace we turn to the elevation view. Here we have a cross brace intersecting the top diagonal at 20 21/32″ (4) and 16.592″ (3). Drawing in this intersection point in conjunction with the known datum at the extreme right we project the centre line of the brace to intersect with the front ring.

This projected point is within 0.017837600 mm of the point determined by the dimension 8.75″ (1) and 1.057782238 mm where the angled line (2) intersects with the ring centre. This verifies that the actual point of intersection is the dimension 8.75″.

P-47 Fuselage Curvature Analysis:

The following image shows the curvature analysis at each station of the fuselage. Only 4 rogue points were micro-adjusted to align correctly. What we are looking for here is not perfection but consistency. You will notice a small flattening of the side curves around the centre of the fuselage, which is fairly consistent throughout. The primary reason for doing this is to identify any points that will create a negative curvature or completely in the wrong position.

The next challenge is to identify the correct tangent points between the humped back ridge curves and the main fuselage. It may tempting to just profile a spline connecting all the points from the ridge curves and the main fuselage but this is likely to create small imperfections where the tight curves meet the main body profiles…so it is always best to do this separately.

In the first image above the red line is the best fit spline connecting all profile points and you can see how it dips below the curved profile from the blue main fuselage curve profile. From the Republic ordinate drawing it is clear the intent is for the ridge profile to be tangent at the point of intersection.

The finished profiles will look something like this…

P-39 Restoration Project: Videos!

P-39 Restoration Project Videos:

A quick update on progress with the P-39 Restoration CAD work. The final CAD models and accompanying 2D manufacturing drawings were issued this week for the Radio Console…so hopefully that will be built soon and I can share some of the installation photos when that is done. The exploded views as shown are the cover sheets for each assembly. Every part is fully dimensioned and detailed on separate sheets.

In addition, the Oil Shutter and the Auxiliary Switch Box are well-advanced in the CAD development stage. These are currently in abeyance while we check the availability of some of the components.

To compliment the Oil Shutter and Aux Switch Box CAD work I have also developed a few basic component assembly videos that are now on YouTube.

**Oil Shutter Assembly: https://www.youtube.com/watch?v=5BMy2KQCYOw

**Auxiliary Switch Box: https://youtu.be/qzgjAaaRx9Q?si=1qF6pE6_ow8dA-KW

I hope you enjoy the videos.

Update: 31st August 2024:

Have now almost completed the Coolant Shutter CAD model for the P-39. All bolts, rivets, nuts and screws are modelled to exact AN and MS standards. Hopefully, in the next week or so I will do an assembly video and upload that to YouTube…so stay tuned for more updates.

A quick note on relevant standards for bearings. The Bell drawings typically refer to type “K6A” or “K8A” which is equivalent to the AN201 standard (not the AN200 that refers to types KR6 and KR8). The AN201 standard was replaced by the MS27641, which in turn was cancelled in 1995 and replaced by SAE-AS27641 (dated 1998).

Finished CAD Model:

Technote: Learning Resource for 3D CAD!

Technote: Learning Resource for 3D CAD!

Today I had an interesting conversation with a University lecturer on utilising historical blueprints as a resource for learning 3D CAD. I have been involved in similar discussions in the past and I do think they are an ideal source for those that are beginning this journey. I once helped a college to develop a curriculum for their students learning CAD on the principle that they would be more engaged in the learning process if they were developing a real-world object that they could actually relate to.

It does make a lot of sense and I would encourage new users to seriously consider the many benefits of using blueprint resources for learning. A typical aircraft design covers complex mechanical items, hydraulics, electrical, sheet metal, moulds, integration with external resources such as Excel spreadsheets as well as familiarising the end-user with tolerance application. Never mind the added benefit of how to prepare quality, fully dimensioned 2D drawings. All disciplines in one package!

I work with a lot of different CAD systems, not just Inventor, though the main reason for using Inventor is because it is accessible as a trial product more so than many others and that this industry is not one normally associated with Inventor…so it is a nice challenge. Occasionally, particularly with other CAD systems, I tend to evaluate them using the blueprints as source material to cover the many aspects of their functionality.

The blueprint archives are not expensive when you think that you could get 10000 blueprints for a small amount of money. The downside of having so many blueprints is finding what you need to help with your learning task. The P-51 Mustang blueprints come complete with a fully detailed drawing list which helps enormously. The P-39 blueprints are roughly sorted into categories which helps in this respect. The Fw190 and Bf109 sets are also very good but as they are in German this sometimes can be counterproductive if it is not your first language.

I am currently putting together a free random collection of a dozen or so blueprints from the various Aviation archives that will give you an introduction to real-world applications and a head start on your project. Just drop me a line at hughtechnotes@gmail.com.

The initial randomly selected files are available online here. https://www.mediafire.com/folder/iyedg37u0ckku/Blueprint+samples

P-51 Mustang: Rear Fuselage Drawing Rev C

P-51 Mustang: Rear Fuselage Drawing Rev C:

The updated revision C version for the rear fuselage and tailfin is now available in the P-51 Mustang CAD/Ordinate package as both a DWG and DXF format.

Incorporates additional curve data, dimensions and general revision.

As usual, all inquiries to hughtechnotes@gmail.com.

NAA B25 Mitchell: New Project

NAA B25 Mitchell: New Project B-25B,C,D

CaptureE

The North American B-25 Mitchell is a medium bomber that was introduced in 1941 and named in honour of Major General William “Billy” Mitchell, a pioneer of U.S. military aviation. Used by many Allied air forces, the B-25 served in every theatre of World War II, and after the war ended, many remained in service, operating across four decades. Produced in numerous variants, nearly 10,000 B-25s were built. These included a few limited models such as the F-10 reconnaissance aircraft, the AT-24 crew trainers, and the United States Marine Corps’ PBJ-1 patrol bomber.

This project will be another research and study effort to develop the ordinate datasets similar to the P-51 Mustang project. The ordinate data is compiled from drawings, reports, manuals, documentation and correspondence so it does take a long time to do.

For example. the above spreadsheets show the work process, starting with recording the ordinates exactly as set out on the NAA drawings. In this case, the original ordinates are in inches so a second table is created to convert this data to millimetres. The third table is the transposed version; retaining original formula cells; which is then used to extrapolate the actual X,Y,Z coordinates for input into a CAD system (the first 10 frames are shown).

B25 STRINGER

This table is the stringer ordinates which follows the same convention of recording the first table exactly as per NAA drawings then converting this to millimetres. The third step is slightly different; transposing the table data in 4 sections to align the data according to stringer number.

B25 Ordinates

This last table is for the wing center section. The process is similar to the previous tables with the main difference being the extrapolated X,Y,Z coordinates originate from the 30% chord. The actual location of intersection between the wing chord line and the wing reference line is calculated at 33%.

B25 WING CHORD

This is a lot of work just to get to this point I have spent in excess of 48 hours and I still have a long way to go. Once the frame X,Y,Z coordinates are listed they are then transferred to individual frames in the CAD system whereby they will be checked for accuracy.

There are a few ordinates that are illegible on the original drawings which will require further intensive research to determine.

To fully complete all the known ordinate spreadsheets for the B25 Mitchell I estimate will consume almost 300 hours of work. The P-51 Mustang set; created in a similar manner; was almost 3 times the number of manhours.

The end result is a comprehensive list of known coordinates that will generate the requisite fuselage, wing and empennage profiles within seconds in all major CAD systems…so it definitely is worth doing.

b25 mitchell ords

Fuselage total X,Y,Z points 2x 1043 = 2086

Wing total X,Y,Z points 2x 870 = 1740

Update 7th May 2020:

Continuing the development of the B25 Ordinate dataset I now have the majority of the wing rib profiles recorded. Some reconstructive work was necessary on the outboard ribs to obviate the poor quality of the original NAA drawings.

Every legible point is added to the spreadsheets and then meticulously created in the CAD system. Where information is unclear the cad extrapolated values are closely checked against the appropriate entry on the original NAA drawing to identify matching numericals or part thereof. Once I have consistency with the graphic output and the NAA drawing information this is then entered into the ordinate spreadsheet.

The attention to detail is typical of my approach to building these ordinate sets. Nothing is taken for granted and the primary reason why these datasets take so long to develop.

b25wing9

b25C Mitchell

Update 12th May 2020: Project Status:

  • Fuselage: Frame Ordinates and CAD Profile 100%
  • Fuselage Stringers: Ordinates and CAD Profile 30%
  • Inner Wing: Ordinates and CAD Profile 100%
  • Outer Wing: Ordnates and CAD Profile 100%
  • Rudder: Ordinates and CAD Profile 100%
  • Vertical Stab: Ordinates and CAD Profile 100%
  • Horiz Stab: Work in Progress.

Update 16th May 2020: Empennage:

Update 19th May 2020: Rear Fuselage:

B25 Rear Fuselage

Often it is necessary to pull together several resource documents into one drawing to better understand key datum relationships as I have done here with the rear fuselage.

Update 21st May 2020: All Done:

This is a good example of what the ordinate datasets are all about.

Making sense of this:

B-25 OUTER WING2

To develop this:

B-25 OUTER WING

The complete list of known ordinate points for the B-25 B,C,D Fuselage, Wings and Empennage are now recorded in a set of excel spreadsheets. A few additional drawings (PDF and DWG) have been created to further clarify the main datum points for aligning the main assemblies and a 3d Autocad drawing of full assembly profiles.

  • Fuselage: Frame Ordinates
  • Fuselage Stringers: Ordinates
  • Inner Wing: Ordinates
  • Outer Wing: Ordinates
  • Rudder: Ordinates
  • Vertical Stab: Ordinates
  • Horiz Stab: Ordinates
  • Nacelle Firewall: Ordinates

All enquiries please contact me at HughTechnotes@gmail.com

Grumman F6F Hellcat: Wing Ordinates

Grumman F6F Hellcat: Wing Ordinates

I wrote an earlier article on my work with the F6F fuselage ordinates which I have recently updated. Whilst revisiting the archive I also came across the Grumman wing ordinate drawings and decided to develop those as well. I was reluctant to do this as the original drawings were not that great.

Thankfully it was not as bad as I first suspected, though it has taken me over 7 hours to painstakingly enter each ordinate manually to tabulate the ordinates in Excel.

F6F Wings

I still have to interpolate the data to generate the appropriate X, Y, Z coordinates; set out from the 35% chord; which I will endeavor to do over the next few days.

F6F wings 2

To verify the ordinate dimensions the following equations are applied. The chord length is for any wing chord whilst the LER is only applicable from station 75 to station 252.

f6f calcs2

To be honest the F6F Hellcat was not even on my to-do-list but a conversation with a colleague about the F6F performance characteristics prompted me to have a closer look at the archive. Surprisingly it is very possible that this archive may have sufficient information to generate an entire aircraft ordinate set, which is quite rare.

f6f

I will update this post when the wing model is complete, so come back soon.

Update August 23:


I have checked the Centre section profile for accuracy and noticed one point out of alignment by 2mm towards the leading edge. Removing this point allowed the natural curvature of the spline to define an acceptable profile as shown. The curvature check shows that this curve now matches the Leading Edge Radius.

The trailing edge extends beyond the 100% Chord by 5/8th inch on the centre section (Station 0) which tapers to zero at Station 252. Drawing a straight line segment from the Trailing Edge Radius results in perfect alignment with the spline.

Centre Section Stations:

f6f ctr section

Outer Panel Stations:

F6F outer wing

It is not unusual to have a few rogue points from the tabulated ordinate data which is why it is important for a detailed analysis like this.

And here, at last, the complete wing assembly:

f6f wing assembly

2D Draughting to 3D Models

2D Draughting to 3D Conversion

2d to 3dTechnical drawings, detailing the specifics of your design can be critical for the communication both internally and externally. We can transform your 2D CAD or fully dimensioned legacy paper drawings to 3D Models using our experienced engineers to ensure drawings are 100% accurate and adhere to the most relevant standards and protocols.

3D Cad models will be fully inclusive of manufacturing tolerances as specified. New 2D drawings will be derived from the 3D model, dimensioned and denoted as original.

Attributes and BIM IFC data can be incorporated according to your engineering and company standards for Structural, Mechanical, Building Services and Equipment projects.

We normally use the Autodesk Inventor but are equally capable with all the Autocad based products from which we can provide native format model files or various other formats to suit your requirements, including DWG, IFC, STEP and STL.

We can provide CAD modelling services for your restoration project, adhering to all appropriate standards and design specifications.exit

Update: Mustang P-51 Project & Operation Ark

Update: Mustang P-51 Project & Operation Ark

The Mustang P-51 project is on hold whilst we review the CAD systems we will use for Operation Ark. To date we have utilized both the Autodesk Inventor & the Dassault Solidworks for our projects and research. We have another contender for the project which is Solidedge, until recently this was not a viable option but the latest version ST8 exhibits many of the features we would need.

Operation Ark will be a long term project requiring many man hours of work to research and build literally thousands of models, so it makes no sense to have different CAD products for this project. There is also a cost consideration as the project will rely entirely on goodwill and donations to support our efforts and assist with  CAD software.

Collaboration technologies and access to rendering farms for final processing of the CAD data are also key considerations. We have received offers of support from a few fellow enthusiasts to help with the Cad model developments and rendering; the latter being from Bilby…thank you very much for your support. Some comments from fellow enthusiasts:

From Alan “I love your Operation Ark initiative, and would be more than willing to play a role in any capacity.”

From John; “ARK is an extremely important project and I congratulate you on your vision.”

From Beaufort: “…I am really impressed with what you do and I can see that massive amount of time that you put into it. I also love the design specifics of these aircraft…”

Operation Ark Project Status:

Lockheed_Vega_5

This project is attracting a lot of attention, with many positive responses as noted including suggestions of alternative aircraft for consideration. One of which is the Lockheed Vega , which is a unique aircraft and was; in many respects; ahead of its time.

This is actually a good example for Operation Ark as the only remaining examples are located in the USA with only one flight worthy example, though further research would suggest that number could well be 2. The location alone excludes a large number of enthusiasts from actually ever seeing one either as a static exhibit or in flight!

That is part of what Operation Ark is about, removing geographic constraints and bringing access to everyone; the complete aircraft with everything modeled right down to the nuts and bolts. An exact replica in 3D that can be interrogated online as assembled or as individual components. We are also contemplating extending this to include additive or 3d printing technologies to build a half size replica, making the parts available to interested parties.

WEB11667-2010pBut this is only one of the aircraft being considered and whilst a likely candidate for selection; specifically as we have access to the manufactures drawings; our preference would be for one that does not exist or has only 1 example in existence like the Ta152.

The project though is entirely dependent on the availability of the original manufacturers drawings and specifications, which is our current priority!

Even when we do have access to materials they first have to be evaluated, which incurs a cost for scanning of microfilm archives and then reviewed for completeness. This process is rather costly but ensures that we don’t commit to a particular aircraft that we can only partially build. Usually where we have incomplete datasets we will endeavor to source the missing data elsewhere before we actually exclude the aircraft from selection.

All the research and work published here to date has been done voluntarily in the hope that it will help other enthusiasts.

NAA P-51D Mustang: Standard Part Models & Specs

NAA P-51D Mustang: Standard Part Models & Specs.

I have revisited the standard parts I have been producing for this project to verify that the information is correct and in compliance with the latest National Standards and specifications.

As mentioned previously I will be developing the parts for Bolts, Nuts, Washers, Pulleys Turnbuckles etc…in fact everything that constitutes a standard component pertinent to aircraft manufacture.

The parts specified for the P-51 are universal which have been updated over the years and superseded with new part numbers. These parts are suitable for reuse on other projects, in particular the forthcoming Operation Ark project.

To raise funds to support the “Operation Ark” project I have decided to make these 3D Cad parts library available for a small cost.

2015-07-26_15-26-24  2015-07-26_15-26-52

The part above is the Clevis End (Part #AN161), dimensioned in accordance with the MS21252P 2007 specification. All sizes are incorporated within an Inventor iPart model and in a separate spreadsheet.

“As from 2007 the parts covered by dash numbers shown on AN161 are canceled after 10 December 1971. Steel, carbon and alloy MS21252 parts are inactive for new design. Use only 17-4 PH stainless steel parts for new design and replacement for comparable alloy and carbon steel MS21252 parts and AN161 parts. The canceled AN161 parts and alloy and carbon steel MS21252 parts cannot replace comparable 17-4 PH stainless parts and should be used until existing stock is depleted.”

The CAD 3D model parts include both the AN161 parts number and the MS21252 Part number for comparison. The 17-4 PH number is not included in the model but is listed on the accompanying spreadsheet.

2015-07-27_20-05-59Currently only a few parts are verified; please refer to the Resources page for updates as additional libraries are made available or if you have a special request for a library to be created then drop me a line.

For further details send an email to hughtechnotes@gmail.com