P-51 Mustang: Rear Fuselage Drawing Rev C

P-51 Mustang: Rear Fuselage Drawing Rev C:

The updated revision C version for the rear fuselage and tailfin is now available in the P-51 Mustang CAD/Ordinate package as both a DWG and DXF format.

Incorporates additional curve data, dimensions and general revision.

As usual, all inquiries to hughtechnotes@gmail.com.

P-51 Ordinate & CAD

P-51 Ordinate & CAD Package: 

A comprehensive overview of the Ordinate/CAD package for the P-51 Mustang B,C and D aircraft. This package is the result of over 2 years of extensive research and development incorporating everything I know about the ordinate information pertinent to the P-51 Mustang; now available for download.

Fully Dimensioned Layout Drawings (Autocad 2d):

These are my CAD files that you can use for your own projects. These files are being made available for personal use only and not for commercial gain. Detailed layouts, fully dimensioned.

51j

engine mount revb

Tip 1: The Engine Mount drawing is a good starting point when setting out your CAD model. This will establish the fuselage datum points, Thrust line, Engine mount locations, and Firewall.

The dimensions for this have been triple checked. Incorporates information extrapolated from 6 different documents.

Tip2: Did you know you can work with inch and mm dimensions in the same model. If you happen to be using an mm template and wish to input inch dimensions then just type in the value followed by the unit type; either or in. So for 1 3/8in enter exactly as shown including space and vice versa if working in the inch template and using mm just quote mm units.

Over 228 Autocad 2D Point Profiles Derived from Spreadsheets:

These are my CAD files (DWG) that you can use for your own projects incorporating the point data. These files are being made available for personal use only and not for commercial gain. 2D profiles of all frames for wings and fuselage.Ordinate DWG profile

Ordinate Spreadsheets: 1000’s of Ordinate Point Coordinates (mm and inch):

These are my Excel spreadsheet files that you can use for your own projects. These files are being made available for personal use only and not for commercial gain. All ordinate points painstakingly entered by hand in both mm and inches. Data is sorted and extrapolated to derive 3d coordinates for direct input into most CAD systems.

Original Military Specs AN & MS (fair share) with Dimension Spreadsheets:

Standard specifications and dimensions for parts including turnbuckles, bolts, nuts washers etc. 3D CAD models of these parts are available separately as a collection; refer to the CAD library tab. Relevant parameters are recorded in spreadsheets that can link to CAD models.

2019-10-06_17-03-01The full Ordinate/CAD dataset will literally save you 100’s of hours of tedious work and is available online. For further information please send an email to hughtechnotes@gmail.com 

This Ordinate/CAD dataset is only available from my blog. All work and research were done by me. All spreadsheets and DWG files are fully editable.

Models on CGTrader:

Alongside the ordinate and dimensional research I also have a large number of professionally prepared 3D CAD models for the P-51 Mustang now available for download on CGTrader.These include the Tailwheel assembly for the P-51 Mustang. All parts, including all internal components, nuts, bolts, washers, and pins modeled to original standards. Tailwheel CAD assemblies on CgTrader:

P-51 Mustang TW Shock

exit These CAD models include fully itemized layouts for each assembly.se

As usual please get in touch at the following address for all inquires HughTechnotes@gmail.com 

NAA P-51D Mustang: Fuselage: Conics

NAA P-51D Mustang: Fuselage: Conics

In the preceding article I had some fun with polynomials and how they could be useful for determining a smooth fit spline for the development of the Mustang fuselage. As a follow up to that article I wanted to share some research relating to conics.

The Mustang P-51 was the first aircraft to be completely defined by conics. The designer Edgar Schmued worked with Roy Liming to mathematically analyze the Mustangs shapes, tangents and curves. Conics were used by NAA as far back as 1932 though many of the techniques and equations we use today however were not actually in use until 1959.

The Bézier curves for example were based on the Bernstein polynomial which had been known since 1912 but its application for graphics was not understood till much later. Bézier curves were widely publicized in 1962 by the French engineer Pierre Bézier, who used them to design automobile bodies at Renault. The study of these curves was however first developed in 1959 by mathematician Paul de Casteljau using de Casteljau’s algorithm, a numerically stable method to evaluate Bézier curves at Citroën.

So I started to wonder how did Edgar Schmued and Roy Liming actually apply conic principles and what methods did they use for the Mustang design!

The documentation I have available for the Mustang Wind Tunnel models gives us a clue at the geometric construction for the fuselage frames. The designers used smooth conic sections with key parameters controlled by longitudinal shoulder and slope control curves. The longitudinal curves defined fullness and tangency values for the conics from forward to aft of the fuselage. The P-51 designers found that this technique allowed them to accurately control sectional areas to secure the required effects for lift, drag, stability, and overall performance.

2015-08-03_22-50-45

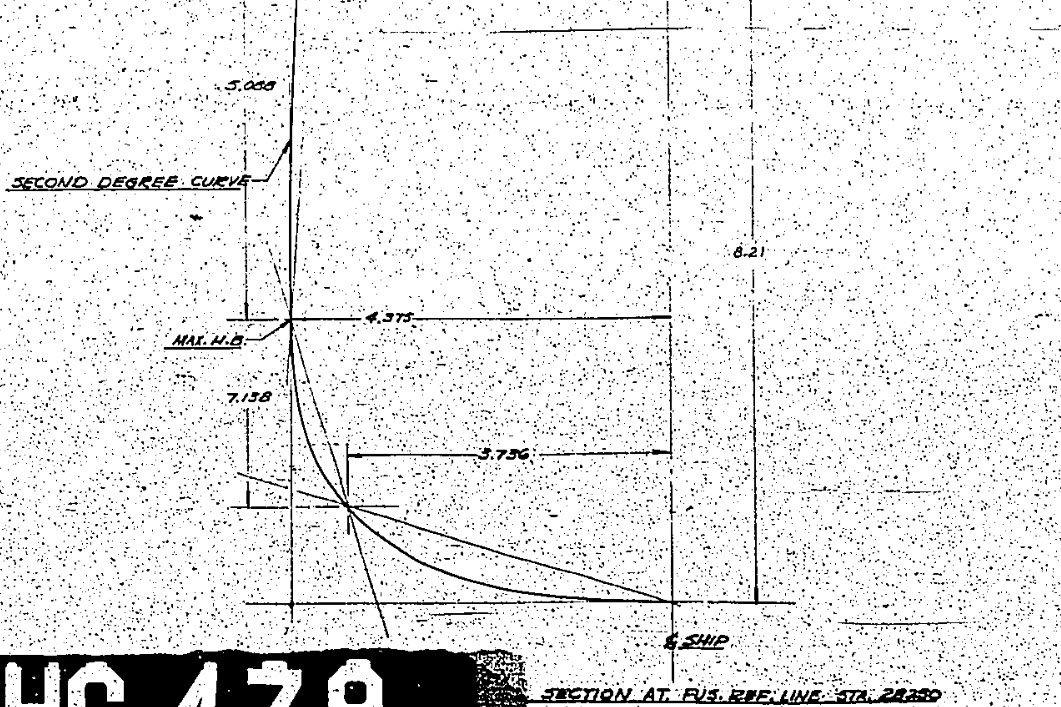
Here we see a scrap view from the wind tunnel models, showing clearly the development of the conic constrained by 2 tangent lines and a third Shoulder Point as a known point on the designed curve.

The intersections of lines extended from the Max Half breadth point and the Lower Ship Centre point illustrate a drafting technique for creating the finished curve for the lower section of a fuselage frame.

Hugh P-51 Conics
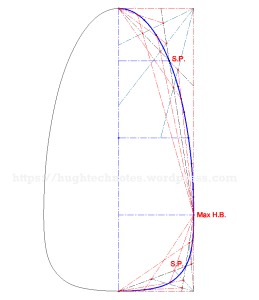
Taking this method further we can describe a curve using a series of extended lines to define any point on the curve as shown in my Cad drawing.

This is my interpretation of a technique for the drafting of a typical Mustang fuselage frame. I haven’t seen this technique applied to a full fuselage profile and whilst the design information I have suggests a similar approach by the Mustang designers I can’t verify that this was the actual technique used.

It is not possible within the scope of this article to go into the detail of this technique, but suffice to say that selecting only 3 points for the lower and upper sections contained within tangential lines provides the basis for accurately determining any other ordinate point on the particular curve. I have uploaded a short video on Youtube here: Drawing a Conic

This is actually a lot better than using the polynomial equations for frame geometry as they only give you a best fit approach based on the tabled ordinates; with limitations; whilst this construction technique will allow the flexibility of defining any point on the curve to an unprecedented degree of accuracy when created in CAD…it works!

So what else did these visionary guys do? I am really keen to further research the mathematical approach that Edgar Schmued and Roy Liming used in the other aspects of the aircraft design and uncover the methods that made the Mustang unique.

It is my hope that by sharing my research and developments that this will inspire others to also research the work of the designers from this era and hopefully in some small measure encourage support for our project “Operation Ark”.

2015-08-06_03-06-27Update: I must have spent a full day browsing through the archives to find more information that would assist with understanding the conics development and thankfully I came across this NAA lines drawing for the cowl on P-51C (NA-103).

This shows the development and tangent lines for everything including the shoulder lines and the fairing lines as well as the main profile contour lines.

Its very important to spend time verifying the information used for developing these designs to validate the research. Sometimes I could spend days just looking for small scraps of information just to verify one dimension, which happened quite a lot on the Ta-152 project!

Full profiles drawn in Autocad from comprehensive excel spreadsheet ordinate collections now available for download. See this article for details.

NAA P-51D Mustang: Document Management

NAA P-51D Mustang: Document Management

An update on the organisation of the document management and archive register.

The USAF Parts catalog for the P-51 is organised by assembly and sub assembly types. For the Tail Wheel assemblies we have one main installation assembly and two sub assemblies for the Shock Strut and Steering Mechanism as follows:

2015-07-02_00-29-57  2015-07-02_00-30-32  2015-07-02_00-32-05

For the document register I have grouped the records and created separate worksheets that comply with the assemblies as setout in the USAF Parts List, listing the assemblies with a Category designation i.e TW-IN (Tail Wheel Installation) TW-SS and TW-SM.

2015-07-02_00-35-30

In the last column I have identified the NAA drawing by type; defining these as follows;

  1. Part: An individual drawing fully detailing a single part or item.
  2. Part Assembly: A fully detailed part drawing that includes additional fitted components like bearings, bushes or rivets.
  3. Main Assembly: A top level assembly listing individual parts, sub assemblies or components.

Note: The Part Assembly is technically a sub assembly which unusually comprise a fully detailed single part to which other elements have been added. Currently for this to work for me in the Cad environment I have maintained the part definition but modeled as a multi-part file. I may decide to change this to an actual Cad assembly file.

To clarify the above and ensure that all parts are accounted for I have created a sub listing of the contents for each Part Assembly as shown in the following scrap view:

2015-07-02_01-02-46

Some of the parts included in the Part Assembly are bushings, which are typically a press fit and reamed to a specified diameter. The bushing included in the Part Assembly is modeled to “as-fitted” condition, but as a matter of record I maintain a separate model file built to the “pre-fitted” manufactured dimensions.

I have also extracted a separate list from the USAF Parts List for the NAA standard parts from which I have identified the information I have in the archive and the data I will need to source elsewhere.

2015-07-02_01-13-08

The NAA standard part drawings in many cases supersede earlier standards for which we have a reference listed. I have these listed in this spreadsheet in 3 columns (on the right); with the first entry being the “Old standard”; the second as the “New Standard” and the final entry being the archive reference. I have had to do this as occasionally the drawings refer to the old superseded standards number.

At this stage I have all the records for the Tail Wheel assembly organised into manageable chunks of information so that I can track progress as marked and manage the eventual build of the final Cad model assemblies.

Curtiss P-40 Kittyhawk/Warhawk

Curtiss P-40 Kittyhawk/Warhawk; the stuff of legends! flown by the infamous Flying Tigers and a remarkable if somewhat underrated aircraft.This is probably my all time favourite aircraft – perhaps influenced by the model I got when I was kid – which of course resplendent with ferocious sharks teeth really stirred the imagination of a young lad.

3902280811_6d029e71ac_o 4105135636_dbd0685269_o
I have in my archive several reels of scans for this aircraft, which I still have to review and document before I can start any meaningful research and development project. All my research projects are based on original manufacturers material, including manuals and specifications.