Technote: Divide a Line in Inventor

Technote: Divide a Line in Inventor:

Dividing a sketch line in Autocad is very straightforward and the question is often asked how this can be done in Inventor. There are a number of options to do this which I will explore and then I will discuss an application where the solution is not so obvious.

Where you have a known length and you wish to locate a point at 20% of the LENGTH it is simply a matter of applying the formula “LENGTH*0.2” for the dimension value. Another option is when you want to divide the line into 5 equal portions then you can use the RECTANGLE Pattern command. You first set the number of points, expand the dialogue and select FITTED; you will then need to select the line dimensions or measure as I have done here for the value.

Another way of doing this is to draw five line segments in succession and apply an equal constraint to each one. For the above; the length is a required parameter, so what do you do when you don’t actually know the length?

The following example is the P-38 Lightning Horizontal Stabiliser tip for which I wanted to document the ordinate points for the ribs. The ribs perpendicular to the stabiliser axis are known dimensions based on the standard profile however I also needed to record the profile dimensions of the ribs set at an angle to the main axis. Admittedly the Lockheed archive does contain a number of ordinate profiles for the canted ribs where unfortunately the majority of dimensions are illegible.
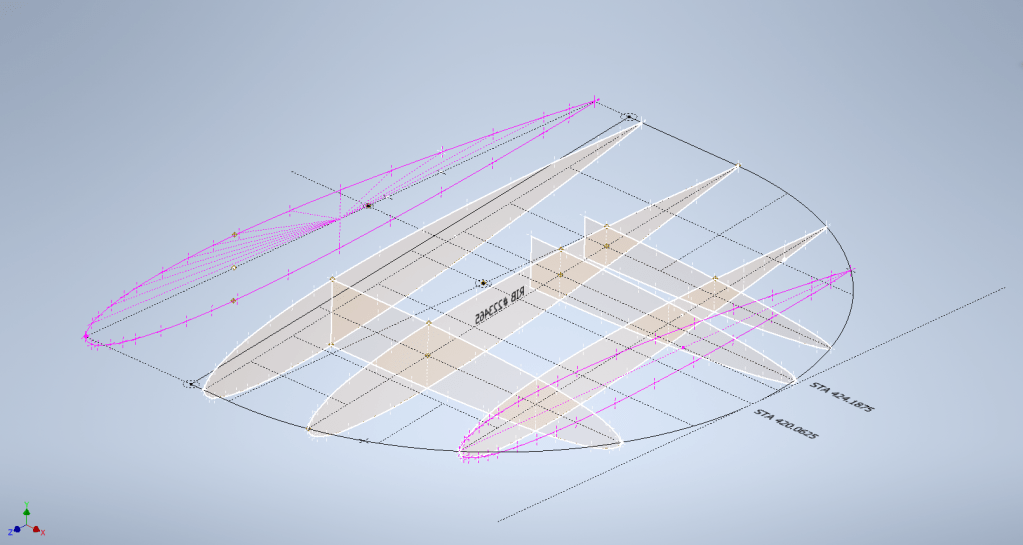
I like to record numbers so it should come as no surprise to those that visit this blog regularly that I was keen to tabulate the ordinate profiles for these canted ribs. The above image shows a number of magenta profiles which are the rib templates illustrating how the surface converges towards the tip extents. Incidentally, the diagonal lines on the main rib profile actually have a purpose…as you view the stab tip on the elevation you will notice that the ordinate points (projected) align with those diagonals.

Getting back to the main subject. The wing rib and horizontal stabiliser ribs follow industry-standard percentage increments for defining the ordinates as shown in the following image. Now we are getting to the main topic…where I wanted to transfer the ordinate locations for the perpendicular ribs to define the ordinate profiles for the canted ribs.
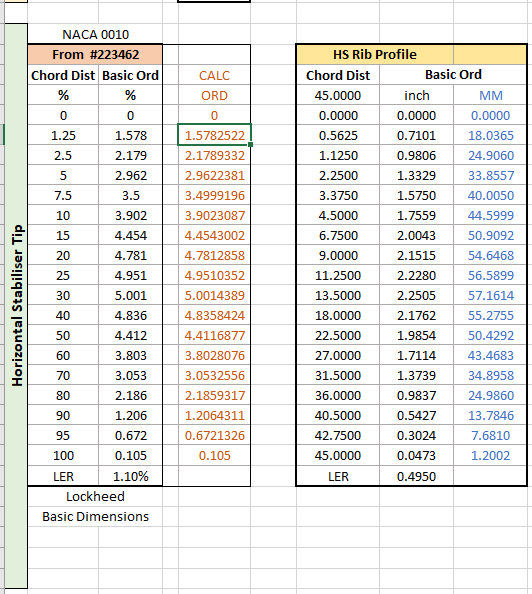
The Horizontal stabiliser ribs are based on the NACA 0010 airfoil profile which is listed as per the Lockheed drawings in the table on the left. The column on the immediate right is the calculated values to improve accuracy which also verifies the recorded data. The table on the right is the transposed calculated values for the main perpendicular Horizontal stabiliser rib with a chord length of 45″.

The above image is the plan view for the Stabiliser tip which shows the centres for the canted ribs and over to the right a number of red vertical dotted lines indicating the position of the reference perpendicular rib profiles. Between those ribs is a blue dotted line with a small circle indicator which is actually the main subject of this article.

The easiest way of defining the canted ribs is simply to loft the known perpendicular profiles and cut along the axis of the canted ribs…it definitely is the quickest way of doing this. However, that leaves a lot of miscellaneous activities in the cad model which just adds clutter.

Transposing the location of percentage increments from the rib table ordinate table to the canted ribs is done like this.
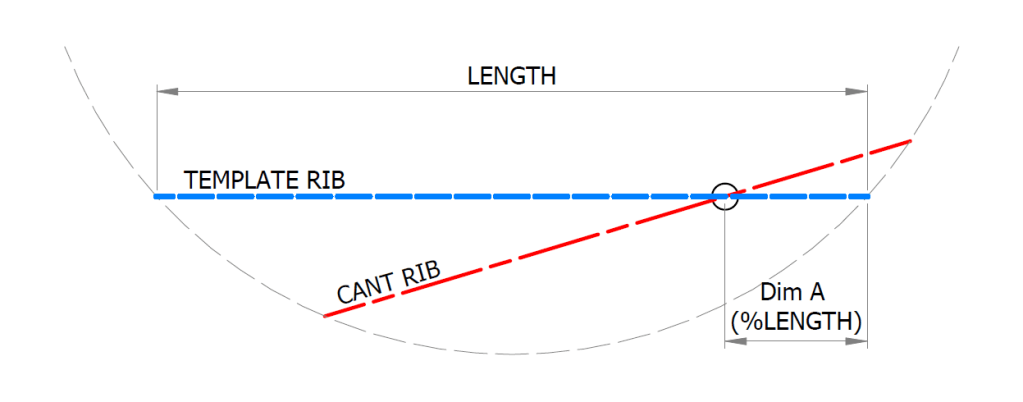
The perpendicular profile chord is the blue dotted line and the canted rib is the red centre line. The LENGTH is the chord length and the dimension A is the percentage increment on that line that we need to find the comparative intersection for on the cant rib. At this point, we do not know the LENGTH as this is dependent on the line position relative to the cant rib at whatever percentage increment we chose.

As mentioned at the start of this article for say a 20% chord dimension we could simply draw 5 lines in succession and apply an equal constraint and so on for the equal divisible portions…but that is not very practical.

So what we do is to locate the template rib line at any arbitrary point on the cant rib and then dimension the length…it does not matter at this stage what the dimension is. Now, this is the key thing we must do…select the LENGTH dimension and change it to a Driven Dimension. Now define the percentage increment (multiplied by Length) you wish to interrogate from the NACA table above and the template rib line will automatically relocate to a position where the Dim A is actually the percentage dimension you define of the total chord length. The software calculates the correct length according to the parameters specified.

An example would be where you specify 15%: you would write “0.15*D20” where D20 is the Driven Dimension.

I have included in the ordinate spreadsheets a table that will calculate the ordinate rib offsets depending on the chord length derived from the above exercise.

You then simply transfer those ordinate offsets to the intersection point of the cant rib. It really is quite clever when you think about it…you are asking the software to define the length of a line based on a percentage value relative to another canted line within boundaries specified by the arc.

Of course, I did not have to do this for all the cant rib offsets just the ones that were missing from the Lockheed drawings.

The P38 Lightning project is now finished. Only known dimensional data is included in this study. The engine Nacelle and Carb intake are omitted due to lack of dimensional information…however the creative among you will find it straightforward to interpolate fairly accurate profiles from the known information incorporated in this model and accompanying spreadsheet dataset.

Drop me a line at hughtechnotes@gmail.com

Technote: Text Emboss Problem

Technote: Text Emboss Problem:

Occasionally when trying to Emboss text in Inventor the command will fail. Most likely the problem will relate to intersecting lines for the font style..invariably it will tell you why it doesn’t work.

This can be very frustrating with few solutions other than reconstructing the font style would be apparent. However, there is a way to resolve this…well at least the particular font I am trying to use for the P-51 Mustang instrument panels. In a previous article, I had opted for an alternative to the MS33558 TTF as this font style is flawed.

I have now found something more compatible and it is called TGL0-17 ALT. This is actually very close to the MS font…however I have still encountered problems.

The solution is to first open the text editor in Inventor and select the font type, set the height, width and spacing. You may need to select Exact for the latter and type in a value to achieve the correct spacing instead of using the defaults. Once you are satisfied with the formatting close the text editor and try to emboss it. If the emboss fails move on to the next step.

Select and open the text editor again and this time highlight all the text, then copy and paste this into MS Word as Text Only. Refresh the font style by selecting an alternative and then select again the TGL0-17 ALT. Copy and paste back into the Inventor text editor, close it and voila now it will emboss.

Before you ask, I have absolutely no idea why this works only that it does in this case So next time you have a problem embossing text in Inventor try this workaround and see if that works for you.

Technote: Inventor Sketch Datum

Technote: Inventor Sketch Datum Point.

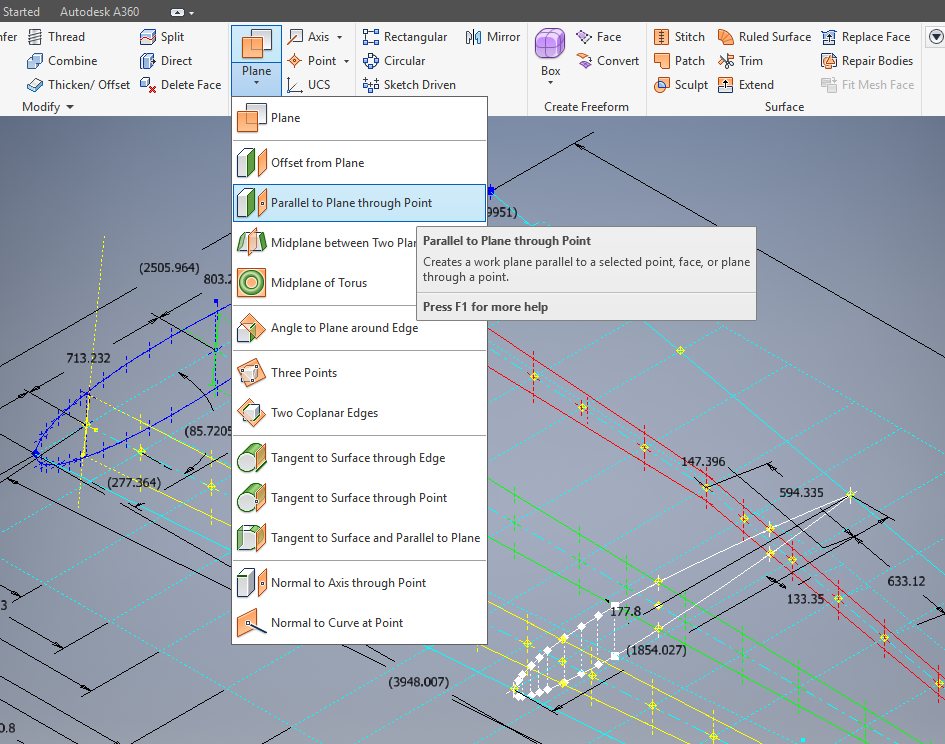
This is one of those instances where you do something on a regular basis and don’t really appreciate the significance of the process. What I am referring to is when you create a sketch Plane using the option “Parallel to Plane Through Point”.

2017-07-27_00-33-25

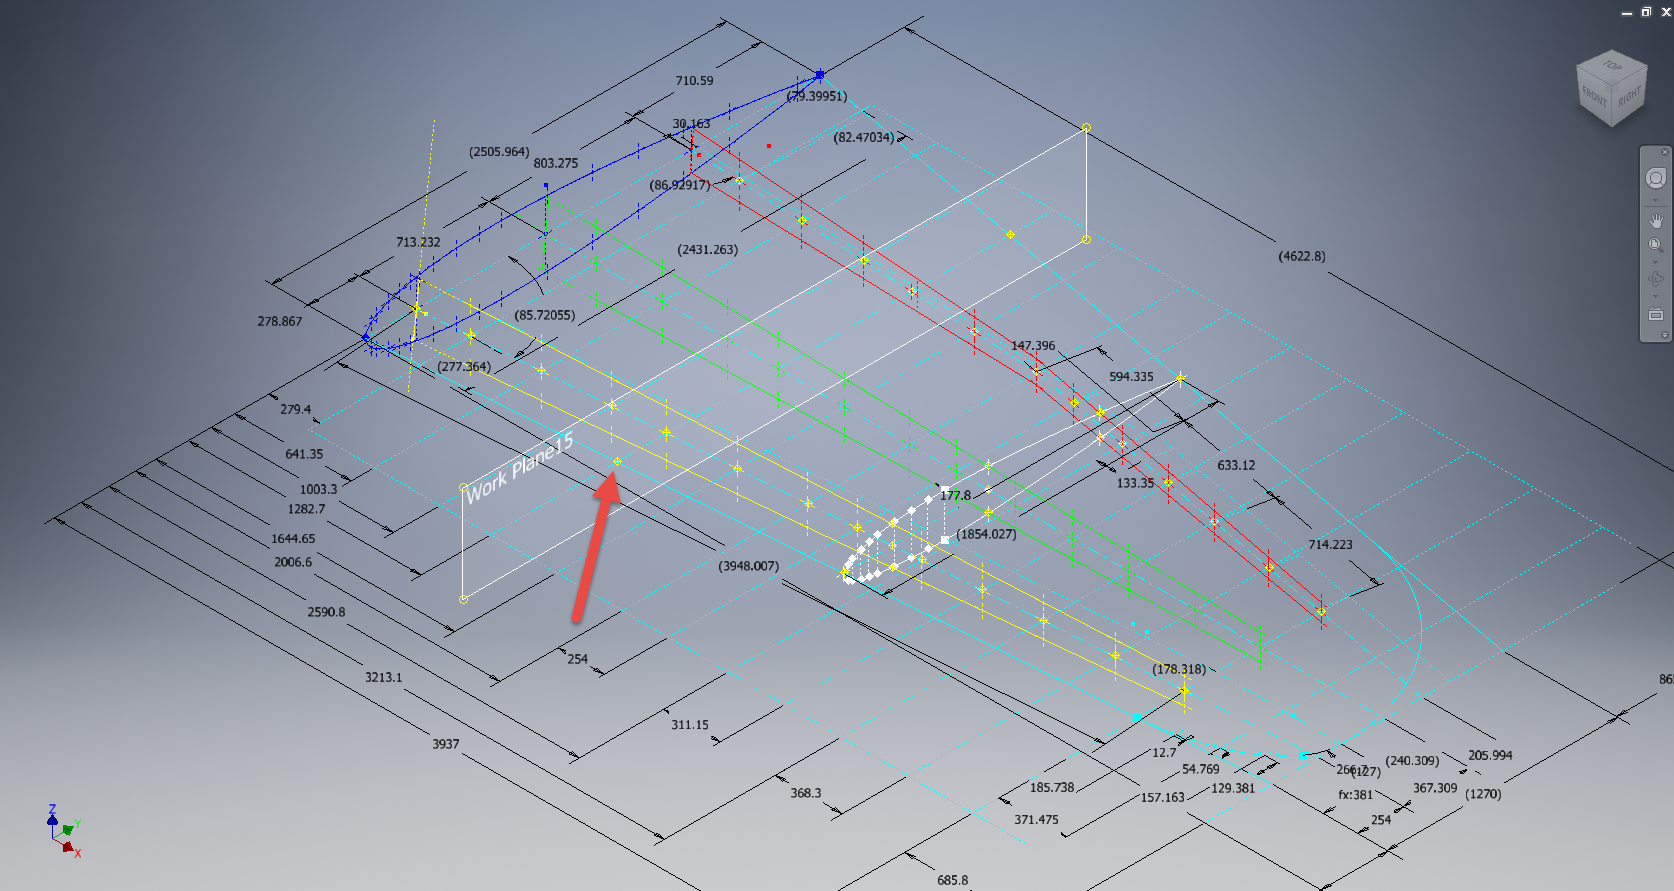
It transpires that this selected point becomes the datum for the particular sketch created on this plane. For this example, for a P-39 wing rib, we have selected a point for the Plane location along the wing leading edge as shown.

P39 wing1

The Bell P-39 and similarly for the P-51 Mustang the wing ordinates are set out from the leading edge of the wing so it makes sense that the rib sketch is setup with a suitable datum point. You can tell the location of the temporary datum in the sketch applied to this plane by the position of the main axis.

This is the really interesting part, when you now import a set of points from the Ordinate spreadsheets it will recognize this sketch datum and import the points relative to this point irrespective of the model origin.

2017-07-27_00-35-12

2017-07-27_00-39-42

This is very useful particularly for these aircraft projects as we tend to use a lot of ordinate data for the outline geometry.

Another Quick Tip:

To automatically apply a tangent constraint to a sketch line just select and drag the line from an existing line and the tangent constraint will be applied.

2017-07-27_01-14-56

Technote: Inventor Quick Tip

Technote: Inventor Quick Tip

Inventor taskbar

When working in Inventor you can access a list of Recent files by clicking the right mouse button on the Taskbar icon.

This also works for most programs with an icon on the Taskbar like Microsoft Excel, Notepad etc.

Bell P-39: Fold Over Flange

Technote: Bell P-39 Fold Over Flange.(Inventor 2017)

This a quick technote to highlight an issue that we sometimes come across with creating flanges in Inventor when one part is sloping away from the other.

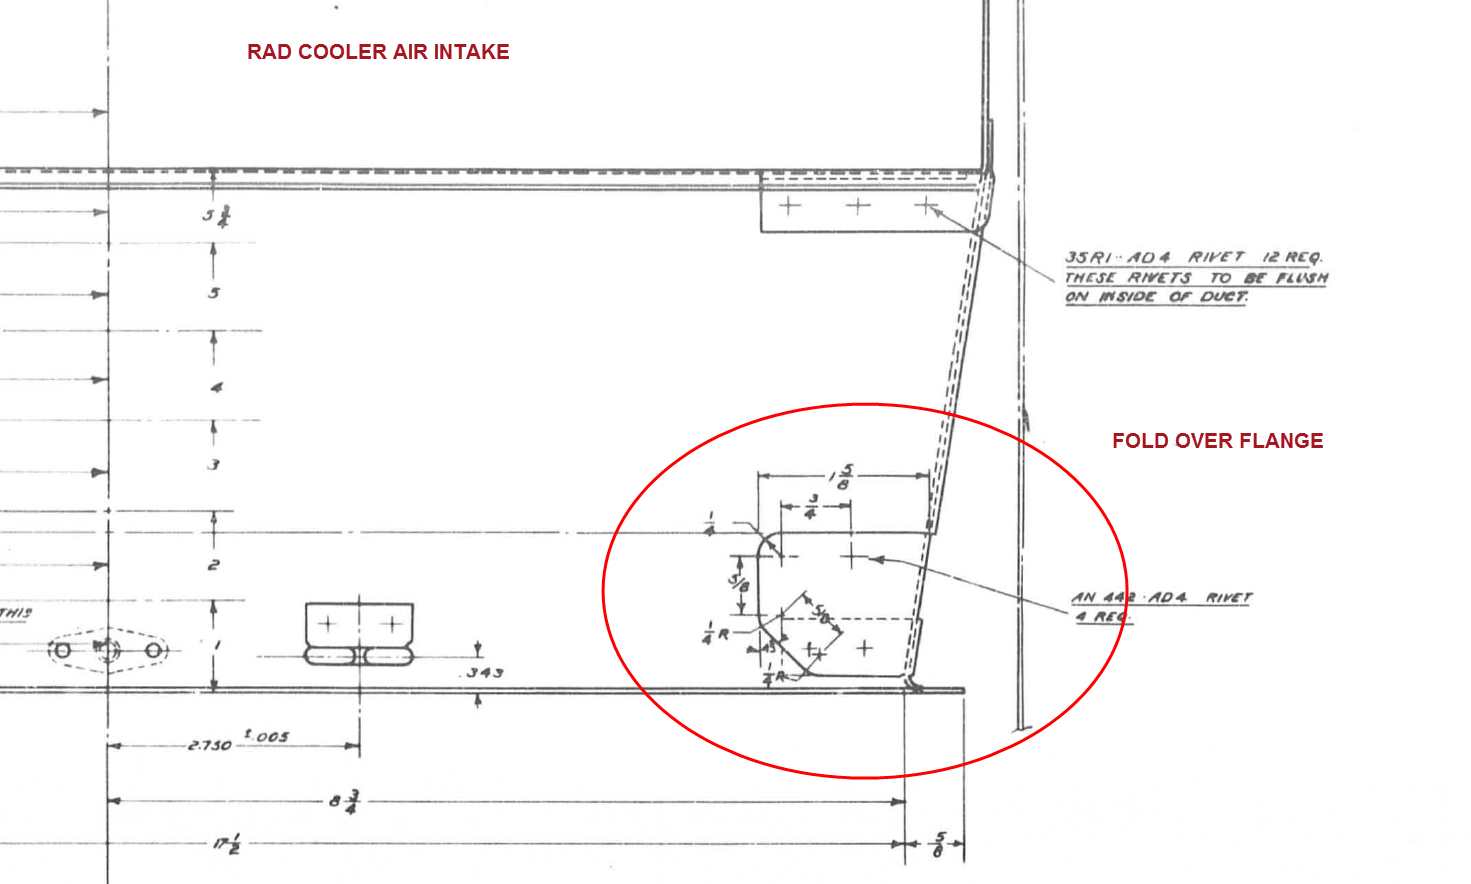
The part we are working on is shown on this scrap view from the Bell drawings. This flange is folded over onto a sloping top plate from the side plate that is at an angle of 105 degrees.

P-39 Oil Cooler Main1

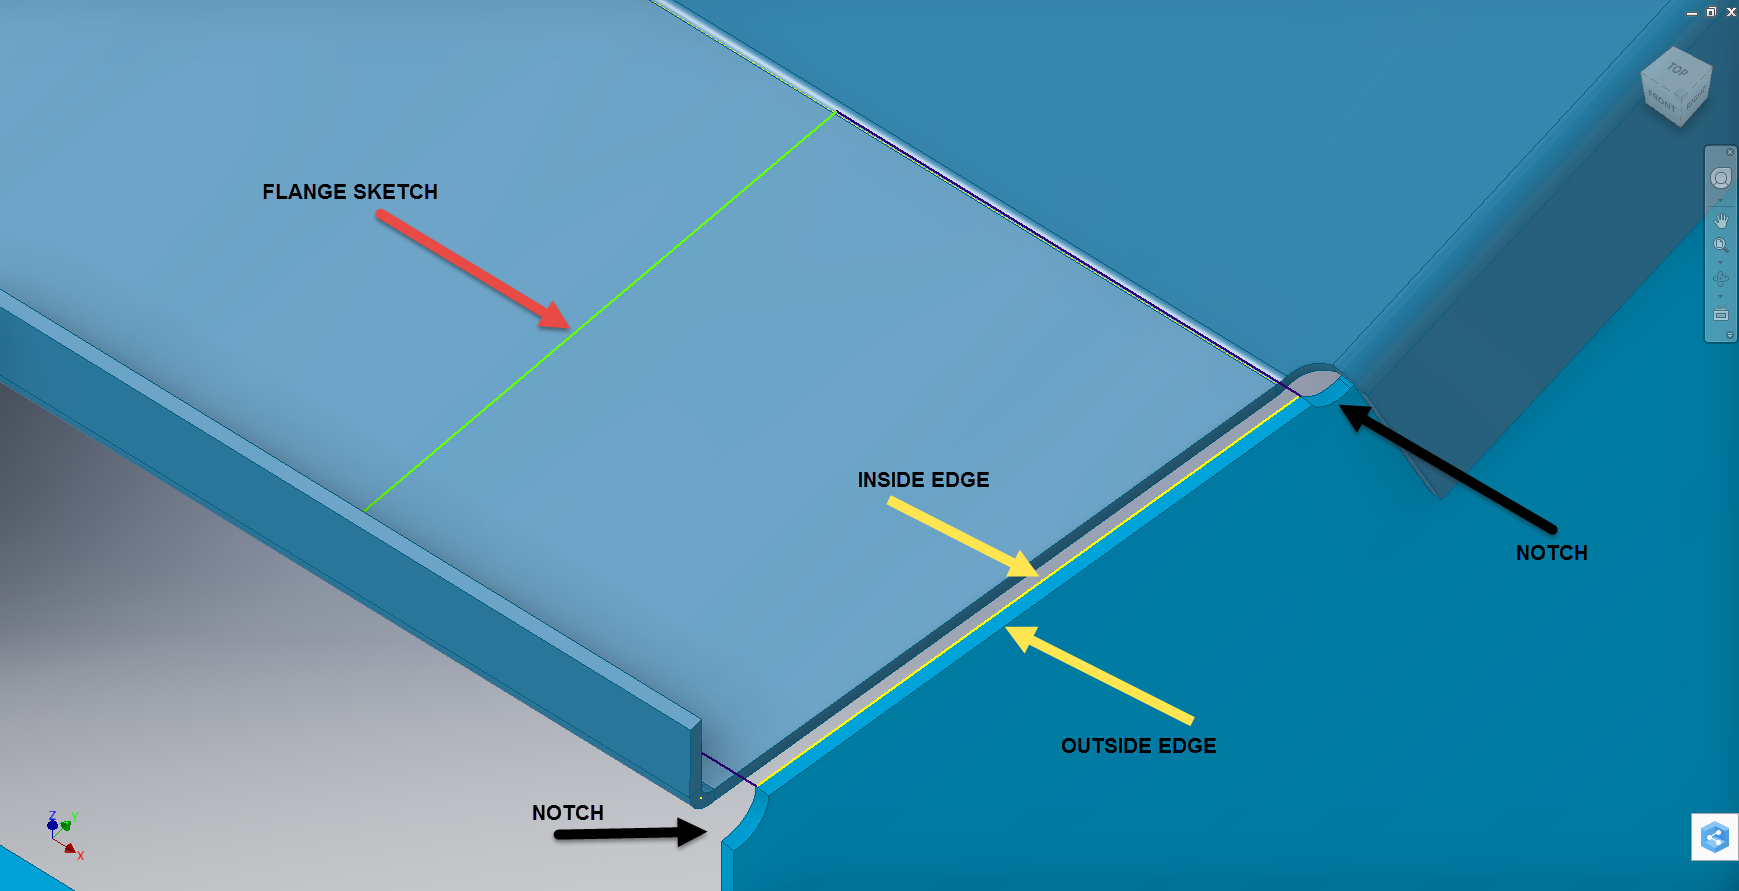
The issue relates to the reference edge selections that will determine whether or not we obtain a smooth transition from the side plate to the new flange.

P-39 COOLER MAIN5

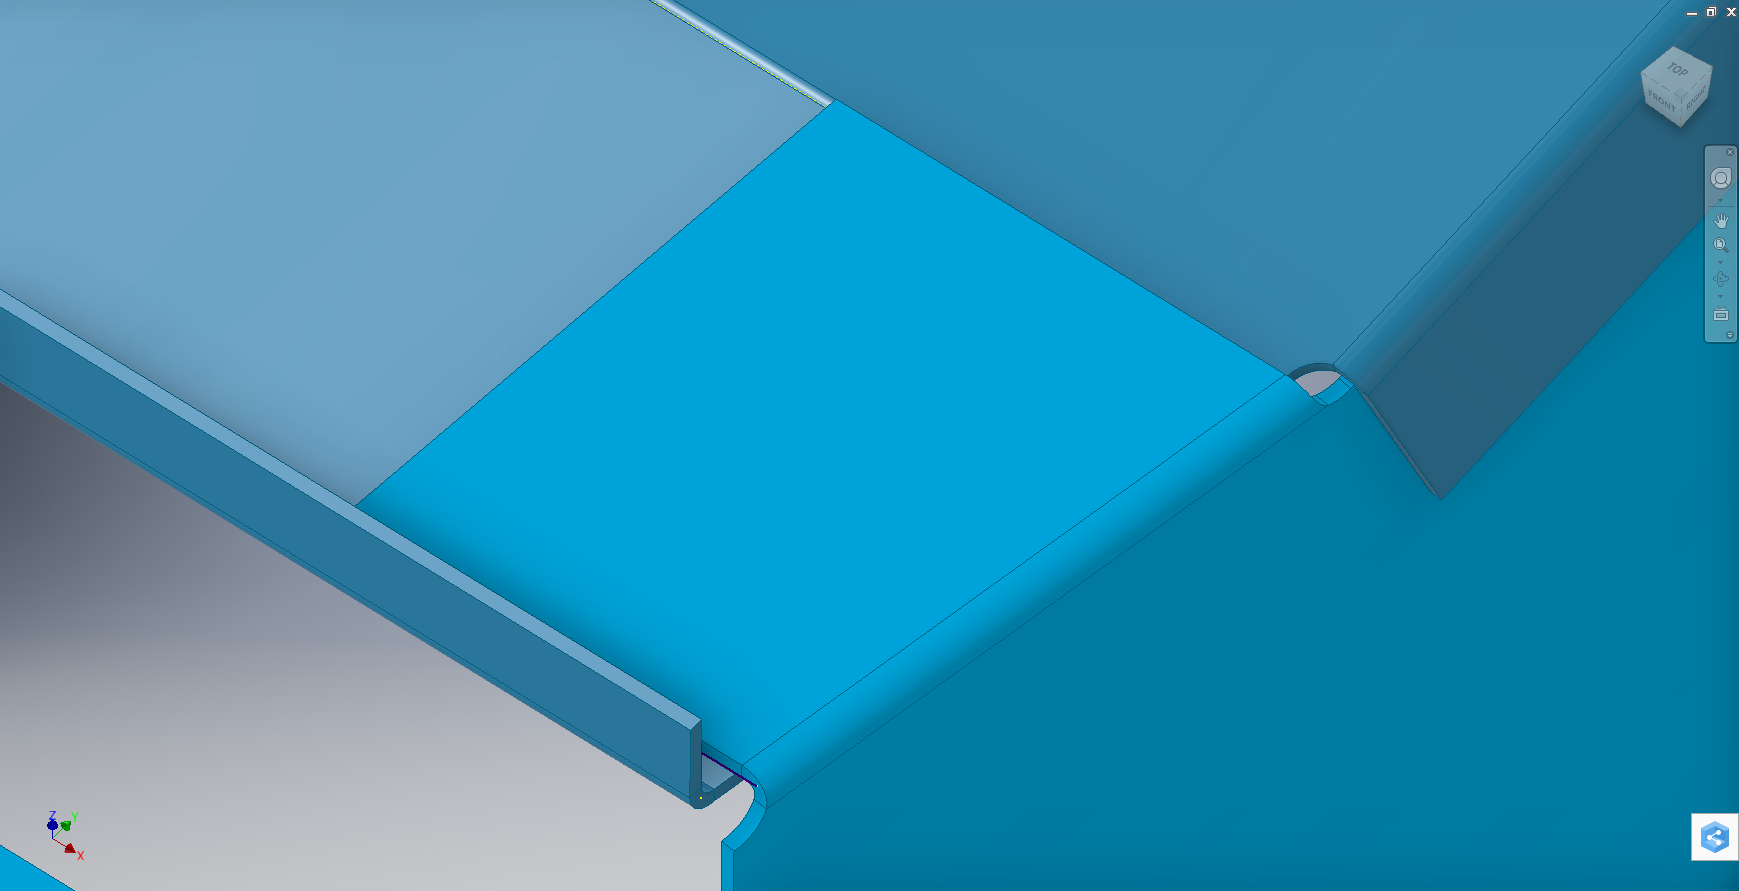
When I first did this I selected the outside edge of the side plate to align the flange sketch. This was not satisfactory due to the notches; that are perpendicular to the side plate; influencing the creation of the eventual flange bend which gave us a rather awkward and untidy bend transition…definitely not good.

So I recreated the sketch; this time aligning with the inside edge of the side plate; which resulted in a smooth transition bend to both notched areas as shown below.

P-39 COOLER 4

Occasionally when creating flanges the selection of which edge is referenced can make all the difference in achieving a satisfactory result. Use the sheet metal Face command to create a flange based on a 2D sketch as we have done here.

I should note that those notches are bigger than they need to be at this stage. I normally develop these complex models using a generous radius until I have completed the construction. Once I have achieved a satisfactory model and everything aligns correctly then I can go back and adjust these notches to a minimum size.

Progress Update:

I have included the rear fuselage section contour lines for reference. Will probably have to leave this project for a few weeks as I really need to spend some time sorting out my garden that is slowly resembling a jungle!

P-39 Aug21

37mm Gun Mount & Rudder Cable Guide Pulley.

Bell P-39: Creating Wing Fillets

.Technote: Bell P-39 Creating Wing Fillets.(Inventor 2017)

Wing fillets are probably one of the most complex aircraft items to model as they need to follow the curvature of both the wings and the fuselage shell. Invariably we have many offsets to contend with and variation in angular alignment of the flanges.

The following images are typical of the manufacturers drawings with an ordinate table listing the X,Y ordinates and angle of the flange at each point.

As usual we would start with marking out what we know; in this case the ordinates points from which we create the reference geometry.

P-39 Wing Fillet1

The reference geometry in this example is the 2 splines for the flanges connecting to the fuselage (left) and the wing (right) with a horizontal base line for the lower flange.

We then check the curvature of the splines to ensure we do not have negative curvature; adjusting the handles to negate this where necessary.

These Fillets are full of tangent and perpendicular dimensional oddities that can sometimes be a real pain to achieve satisfactory results .

Previously we would create a work plane (tangent) at each node and individually sketch the required flange construction lines set to the correct angular value. This was a lot of work and a heck of a lot of sketching. Thankfully Autodesk have introduced some nice functionality to the 3D sketch environment in Inventor 2017 making this task so much easier with provision of logical constraining options and associations.2016-08-14_15-19-34

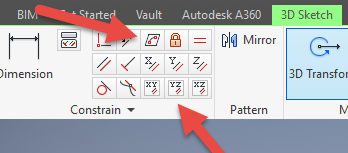
In Inventor we have various planar constraining options as shown. The top one is to constrain a sketch element to a surface and the lower ones are parallel constrain options to the main work planes.

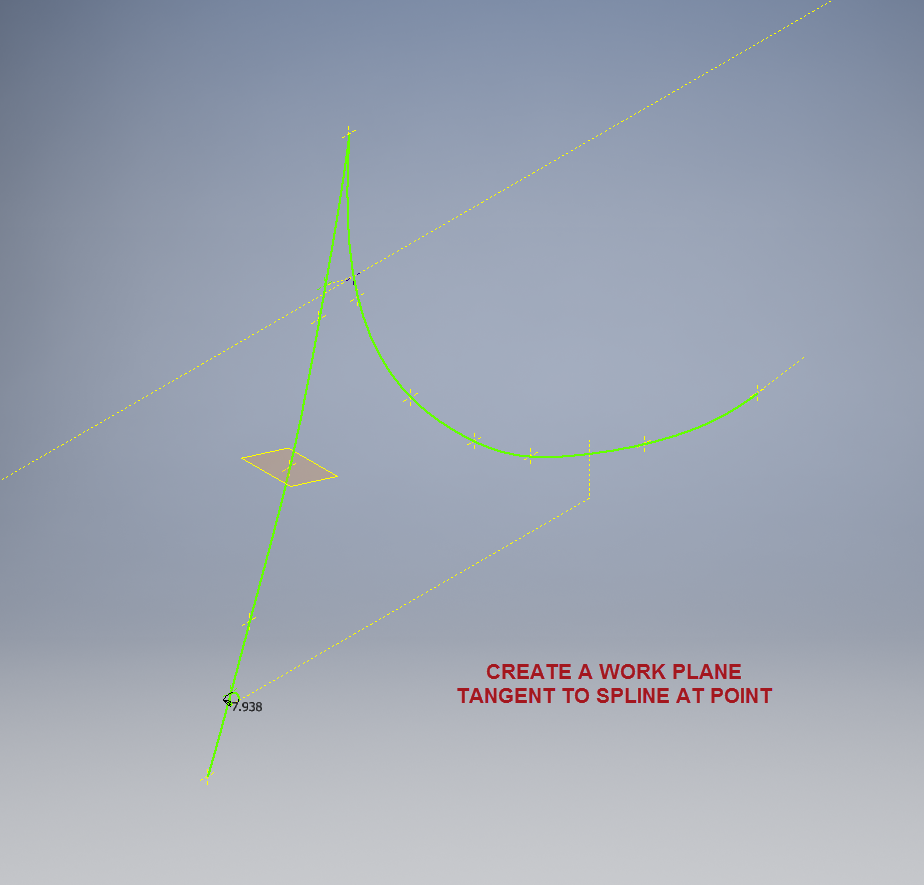
We would still create the work planes tangent to each point as before; I have shown one for clarity, then we simply move straight into the 3D sketch environment to model all the flange construction lines.

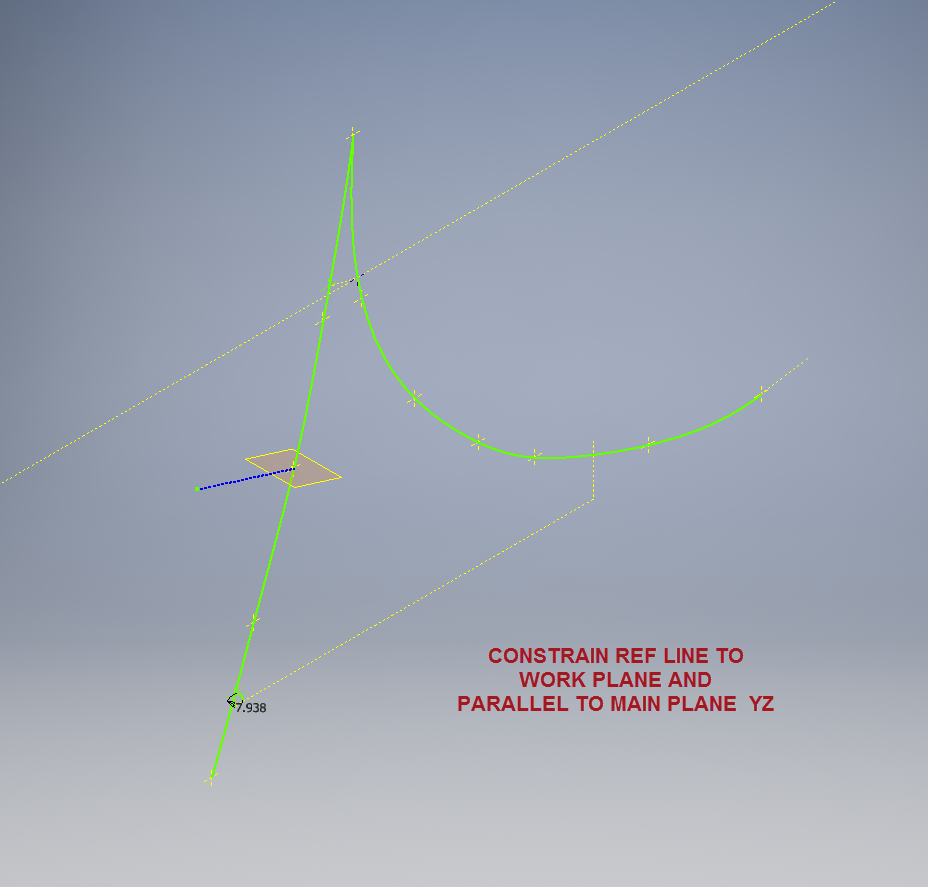
We first need a reference base line constrained to the tangent spline work plane and also be parallel to the main work plane YZ.

P-39 wing fillet 3

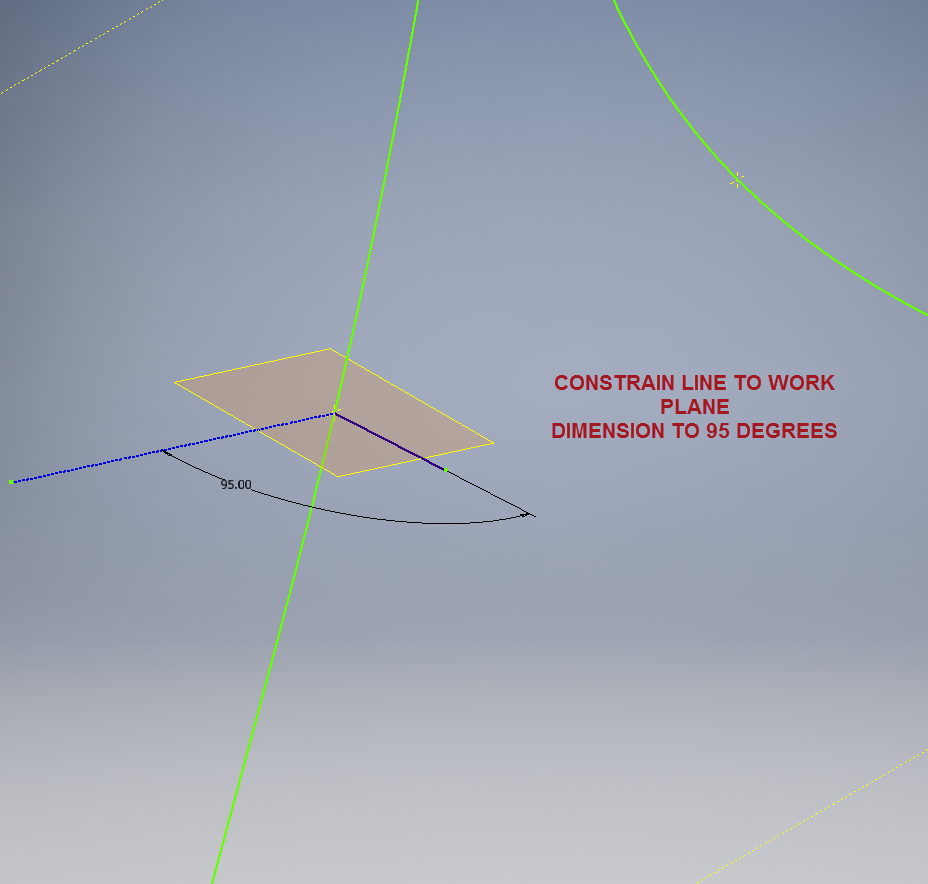
We then sketch the flange line, constrain to the tangent spline work plane and dimension to the reference line as shown at 95 degrees.

P-39 WING FILLET 5

It really is a simple case of drawing a few lines and just using the planar constraint options to ensure correct tangency for developing the flange guide lines. Furthermore you don’t even need to project geometry from the 2d sketch as you place the line it will automatically connect to a point on the 2d sketch.

We continue doing this for all the ordinate points as shown then surface loft the flanges and apply a surface patch to create the main body. I should note that the surfaces shown have already been trimmed to the extents of the part.

It is very tempting at this stage to stitch and then thicken to achieve the finished part, however in my experience occasionally the transition of sharp corners introduces anomalies along the edges which can be negated if we first apply a fillet prior to thickening.

P-39 Wing Fillet2

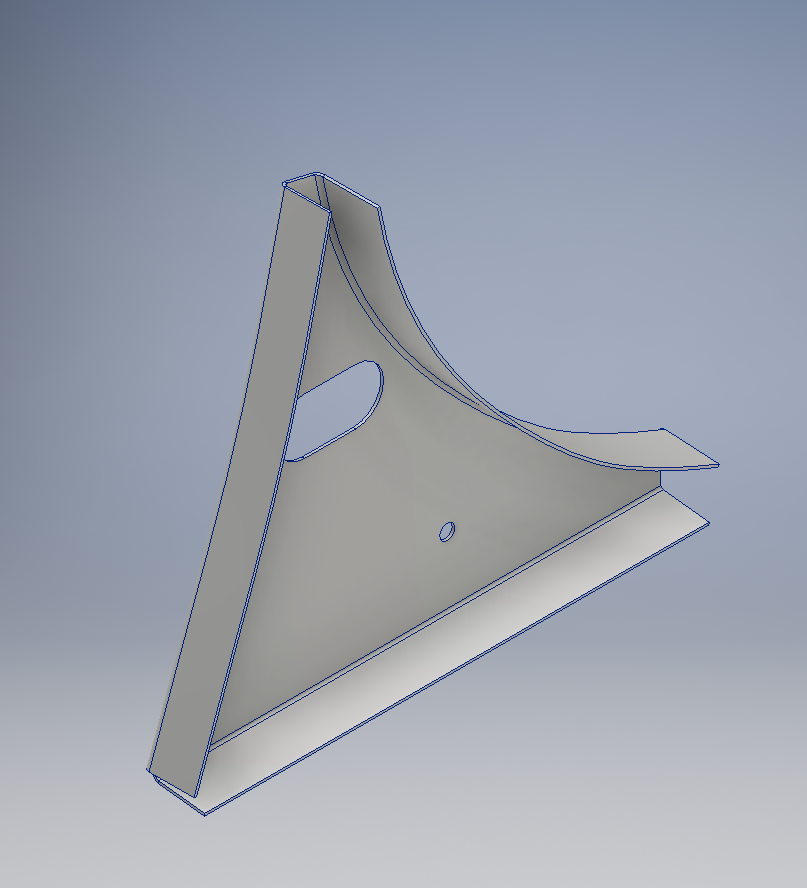
To finish the part after thickening, I converted to a sheet metal part and added a flange to the base at 7.5 degrees, a few holes and that’s it done. There are some flange holes still to be modelled which will be done later when the other connecting parts are modelled and checked for alignment in the assembly.

Progress Update:

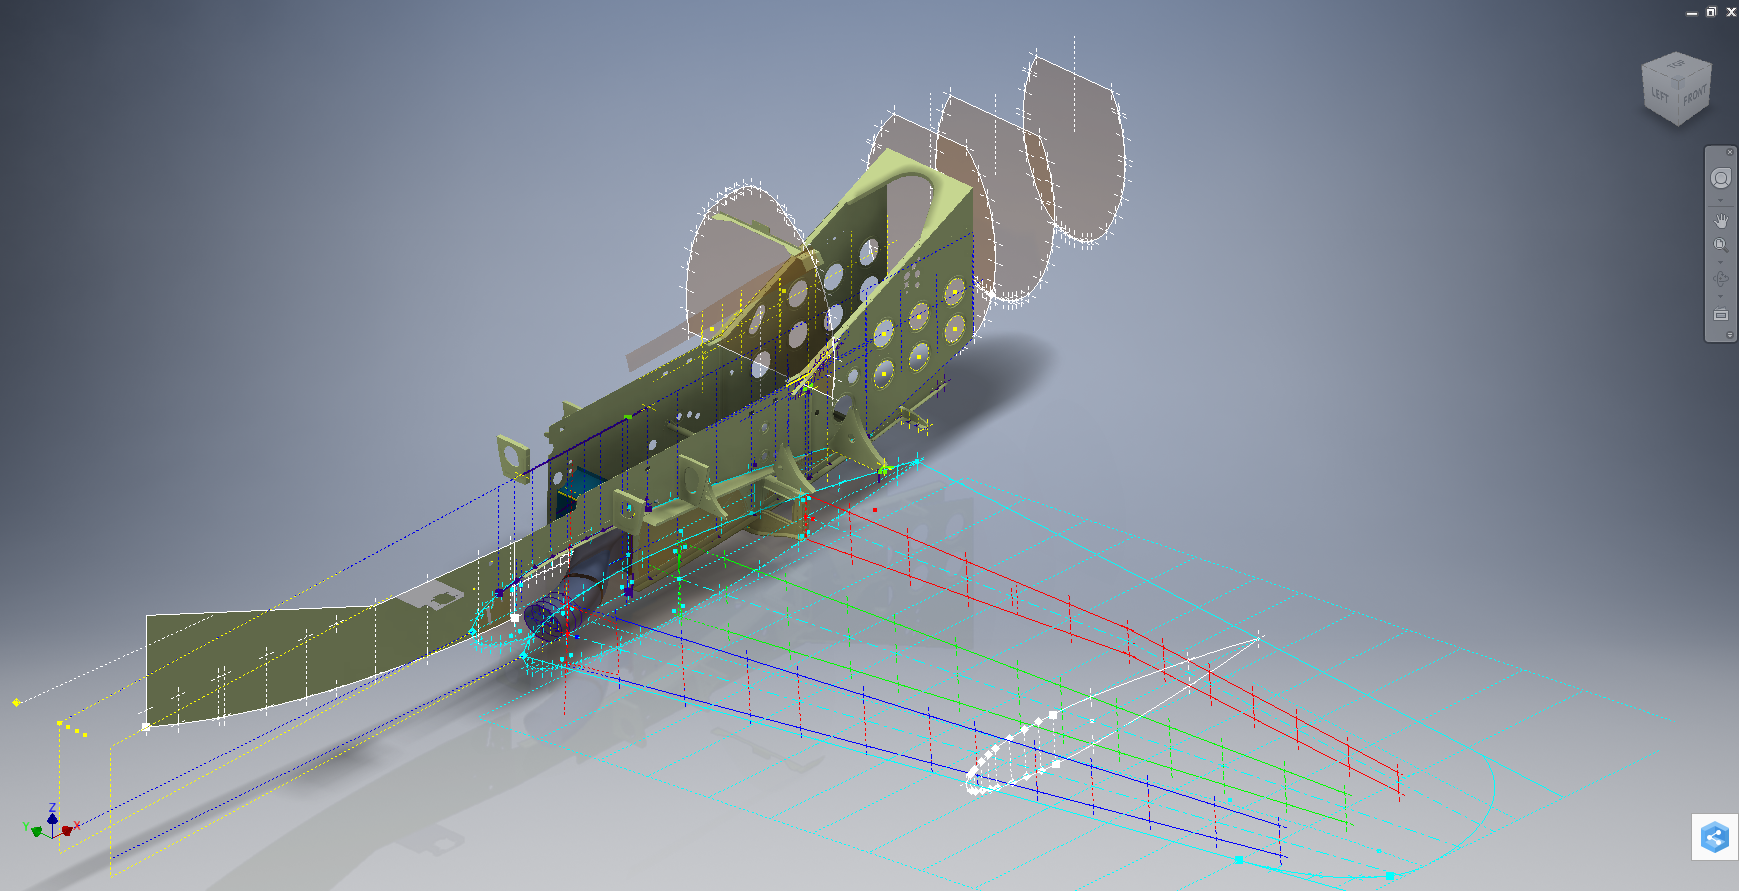
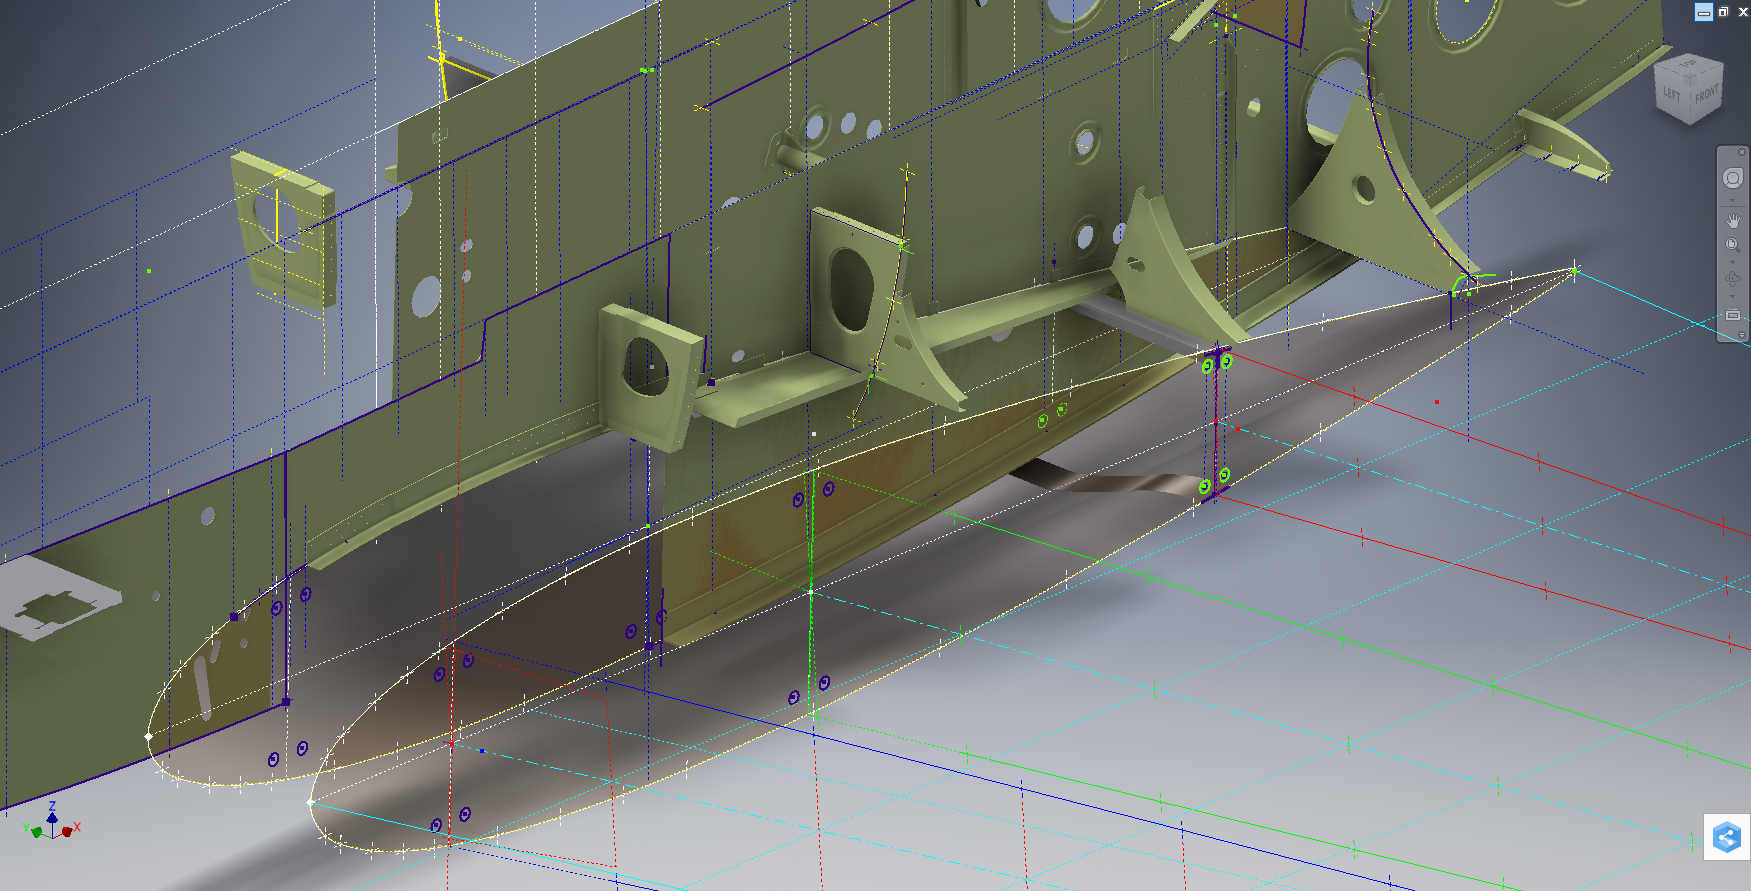
The following image shows a typical interface check between the P-39 wing and fuselage:

P-39 Wing Location

…and here the Radiator Intake Duct, preliminary alignment:

P-39 Rad Intake Duct

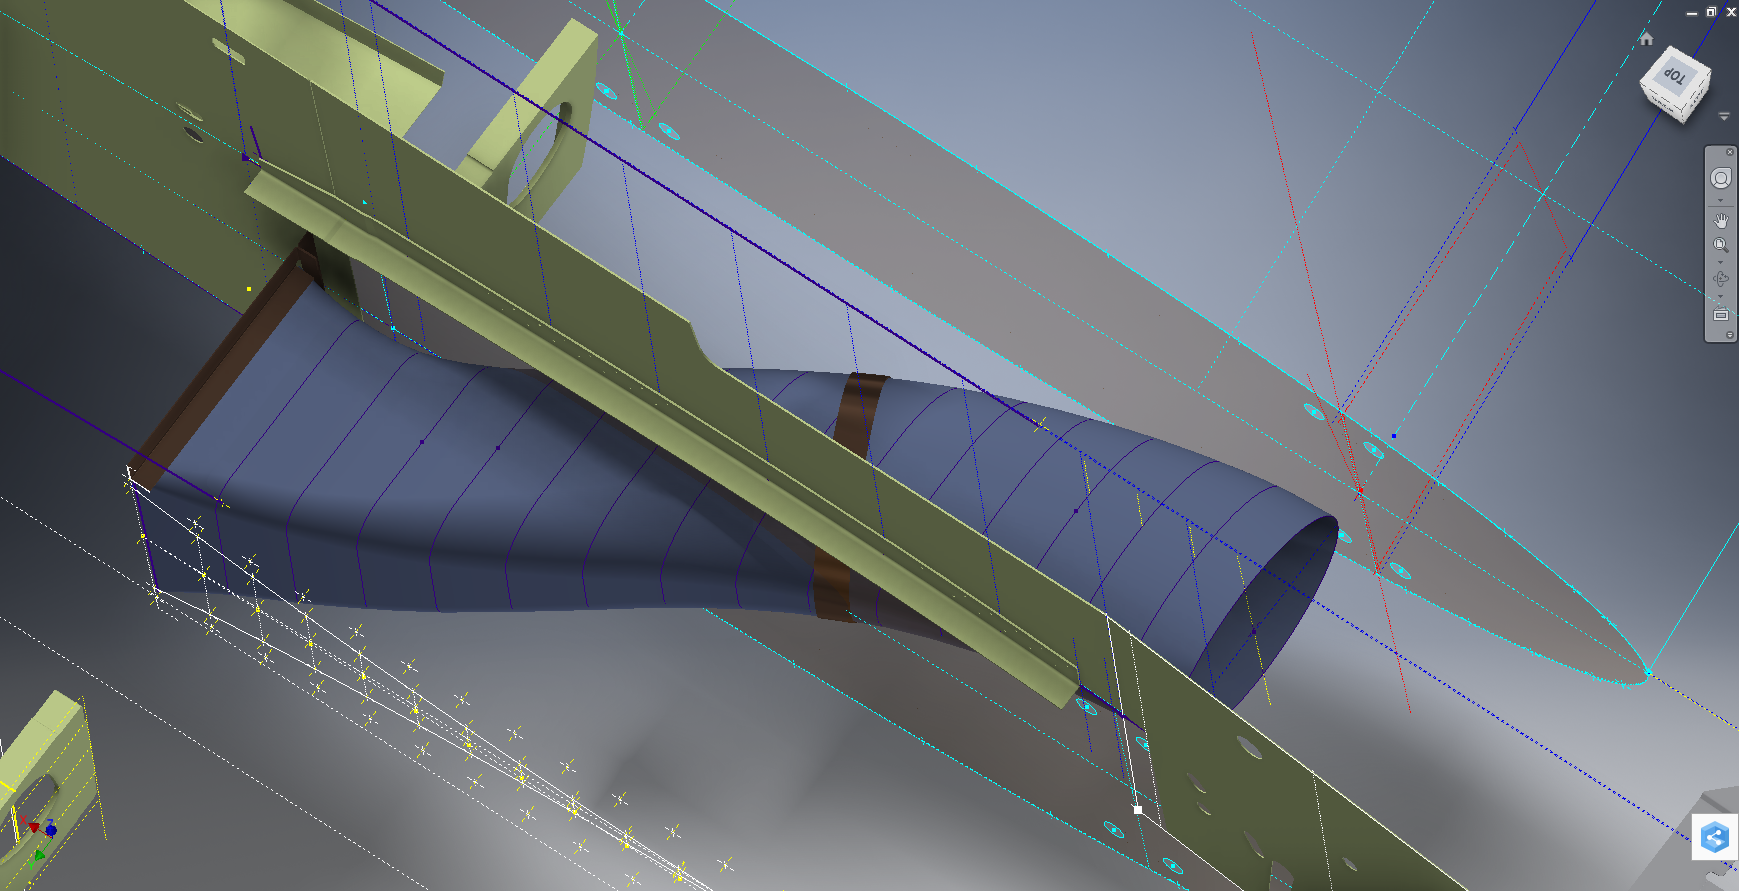
This radiator intake duct was an interesting development as the Bell chaps had provided both the tangential and the exterior dimensions at 2-inch intervals; on plan and elevation; which collectively are projected to form the profiles at each station. The white sketch at the bottom of the image shows these dimensions on the side elevation, with the curved lines depicting the tangent lines. I checked the curvature of this line and I only needed to adjust 2 dimensions by a minuscule amount to correct for negative curvature.

Update July 2022: New Revised P-39 Ordinate/CAD Dataset:

For all inquires please get in touch: hughtechnotes@gmail.com

NAA P-51D Mustang: Project Cad Technote; iParts

NAA P-51D Mustang: Project Cad Technote; iParts

When it comes to organising standard parts using a Cad system like Inventor there are various ways to achieve this. Initially I considered a custom content library or even an iLogic expression linked to a parameter spreadsheet but I settled on using iParts.

The main reason for this is due to the fact that I already have a plethora of data contained in many spreadsheets for everything from ordinates to document registers and at any one time one or more of these spreadsheets is usually open for reference. Therefore the iparts seemed to be the ideal choice by maintaining all the relevant data in a single Cad part file.

2015-07-15_22-54-16

A simple example of this would be for the AN960 standard washers. I could have done something really clever here as the actual part number contains references to the physical sizes and properties of the washers and I had thought it would be great to link the naming convention to the parameters.

However there is no real benefit to be gained from this and would have added a level of complexity that’s quite frankly unnecessary for this type of component.

We have 3 dimensions that define the washer; the Outside Diameter (OD), Inside Diameter (ID) and the Thickness (Thk). We also have a material type but the Cad library will need to be updated to include the specifics of the materials for a P-51 mustang, which is another custom job; so I have ignored it for now!

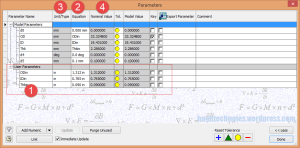
The above sketch shows the expressions of the parameters defining the relationship of the values as declared in the parameters dialogue; this is where it gets interesting.

2015-07-15_22-55-47I should note that the template and default units for this model is millimeters. The standard units for the washers is inches.

This image on the left is the parameters dialogue box to which I first added some user parameters (1) set to “inch” units. I then created the cad model dimensional parameters (2) and linked those to the user parameters (1) with the units set to “mm” (3). The wonderful thing about this is that Inventor will adjust the values based on the unit type automatically; so just by changing the unit type the value will change accordingly, which is verified in the nominal value column (4)…great stuff!
2015-07-15_23-05-30
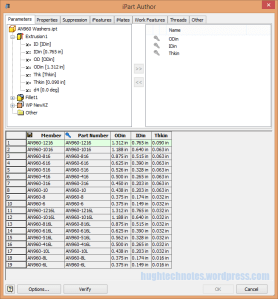
This is the iPart creation dialogue, showing the table of values, input from the standard catalogs in “inches”.

Its very important that the original values are retained as “inch” units so that it is easier to check and verify the correctness of the information and traceability.

Tip: If I already had these values set-out in exactly the same format in excel I could just copy and paste the spreadsheet directly into the iPart table.

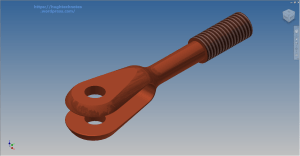
At some stage I will add the material values to the end of this table for each of the components listed. Some examples of iparts include the Locking Stud and Clevis Fork; colour coded to differentiate size..

Locking Stud Clevis Fork

The notion of working with different units is made so much easier by the capabilities of these cad systems. Essentially when inputting the dimensions in a model sketch the value of the dimensions will change if you select either inches or millimeters according to the default template units setup for the cad model; it will even work with fractions.

For example if you type in “3/4 in” for a dimension in a sketch based on the “mm” unit template then the actual value for the dimension will be “19.05 mm”.

Another example; 12 23/64″; for this you type in 12 leave a space then 23/64 followed by “in”…”12 23/64 in” gives us “313.928 mm”.

NAA P-51D Mustang: Tail Wheel Assembly: Update.

NAA P-51D Mustang: Tail Wheel Assembly: Update.

I shall need to temporarily suspend further work on the assembly model as the remaining parts to achieve a full build are created in a later version of the Inventor cad program and therefore not compatible with the version I currently have access to.

So this is as far as I can go with the assembly, though one could argue that it may be worthwhile including the necessary bolts, washers, turnbuckles etc, but to be honest most of this is planned as the final components in the build. The main reason for this is to ensure that everything aligns properly and works according to the design intent before plugging in all those connecting bits!

p-51d mustang rear fuselage

I have some tidying up to do with the fuselage frames and to develop that library I was talking about for the aeronautical standard parts and components…so perhaps this may be the time to get this done.

I also plan to do some 2d detail drawings for some of this modelling to record some of the key information that I have had to research separately from the archive resource and create the Bill of Materials structure that complies with the existing NAA documents for the complete assembly.

2015-07-15_17-17-08

The 2d drawings will also serve as a dimensional check as these objects were built in mm whereas originally they were designed in inches.

Its very hard to identify small dimensional discrepancies when just reviewing the 3d model!

So for now I probably wont be posting too much on the modelling side of things but may include some new cad technotes on the techniques I have used in this project.

TechNote #01: Using Autodesk Inventor for SubStation Design

SubStation Design #01 3rd Feb 2008.

2009-02-25_1220I recently completed a project for a major Electrical Power company in Canada (2005-2007) for which I developed a 3d cad strategy for HV & MV substation design.

This project started in the latter part of 2005 and at that time the best product for what they wanted to do was Mechanical Desktop. The Autodesk Inventor product was considered but the version available then did not have the same level of functionality that we enjoyed with MDT. Today of course that has changed considerably and a lot of the features from MDT as well as a lot of new concepts have been introduced to make Inventor a formidable cad design product.

I should note that this same project has now moved to the Inventor environment.

I mention MDT and Inventor as the main cad products utilised for this strategy, but beyond that I still had to satisfy the criteria and data exchange with the other products used which were AutoDesk Civil 3D and Map 3D. The strategy changed slightly from the MDT concept to align with the DWG exchange capabilities now within Inventor, but overall the main concepts remained unchanged.

Selection of the Cad system was only part of the solution. I spent a considerable amount of time studying the companies engineering practices, the existing library standards and quality control procedures. In addition Procurement, Manufacturing, vendor data and site construction procedures were also studied.

When you put together a cad strategy for any type of project you have to fully understand the company operations and procedures in conjunction with the cad product capabilities to derive a working methodology that works together. In short you are developing an engineering design philosophy that does not impact company business practices.

Modular Approach:

For example this company had a lot of standard assembly drawings in 2d that depicted the various collective arrangements that suit the majority of the different sub station design requirements relating to 44Kv and 230 KV areas, the switchyard, circuit breakers and station transformers. These areas were complete assemblies or layouts and really in that form not conducive to the 3d environment. Requiring only marginal changes I introduced a more modular approach to the company standards by breaking these areas down into manageable chunks of information.

Modularisation actually helped the development of a 3d cad strategy because we could manage the modular units effectively and apply assembly variation directly only to the areas that were affected and not have to deal with large layouts of information that only required localised variation. This was very efficient and as well as helping the file management of these modular units it also provided much more flexibility when it came to designing the substations. The modular philosophy was adopted throughout for many aspects of the project design including land survey data.

Dealing with the company standards was only part of the solution, I also suggested aligning the Procurement schedule with 3D design processes, defined the effective use of survey data, devised BOM solutions for integration with their Procurement systems, developed modelling techniques to improve efficiency (‘smart parts’) and devised VBA applications for the Cad system.

For me personally this was a great achievement, primarily because others had tried before me without success – the problem I believe was that their focus was entirely on the cad product and they had not taken the time to study the entire engineering processes from concept right through to Procurement and construction; without knowing how the whole process works it is almost impossible to devise a solution solely on the basis of an individual cad product.

Furthermore the whole strategy was developed, programmed, designed and devised by myself with no assistance from external sources. I even managed time to assist the Lightning protection chaps adapt the 3d cad to define the areas of influence and protection envelopes.

The Result:

At the end of this project I wrote a manual of over 300 pages that was again broken down into modular volumes to provide access to specific areas of interest. Incidentally when writing any manual it is well worth while considering breaking the subject down into individual subject volumes – this makes it easier to read and the user only has to access a dozen or so pages of data instead of trawling through hundreds of pages.

During the latter stages of the project I demonstrated the potential for the company to design and engineer a complete Distribution Substation in less than 7 days (post concept) which by comparison historically may have taken up to 3 months – a considerable time saving and of course increased efficiency.

The key to the success of this project was simply the understanding of all the various aspects of an engineering design process and identifying the work methodology that could best utilise the capabilities and integration of the CAD systems as part of an overall strategy and not considering the cad systems in isolation.

Please visist BIM Sub Station Web Site for more information and detailed workflows: Design Link

Contact Details:

If you are interested in more information on using Inventor for SubStation design or just wish to find out ways of modularising your own company standards for adapting to a 3d environment then please contact me at hughtechnotes@gmail.com