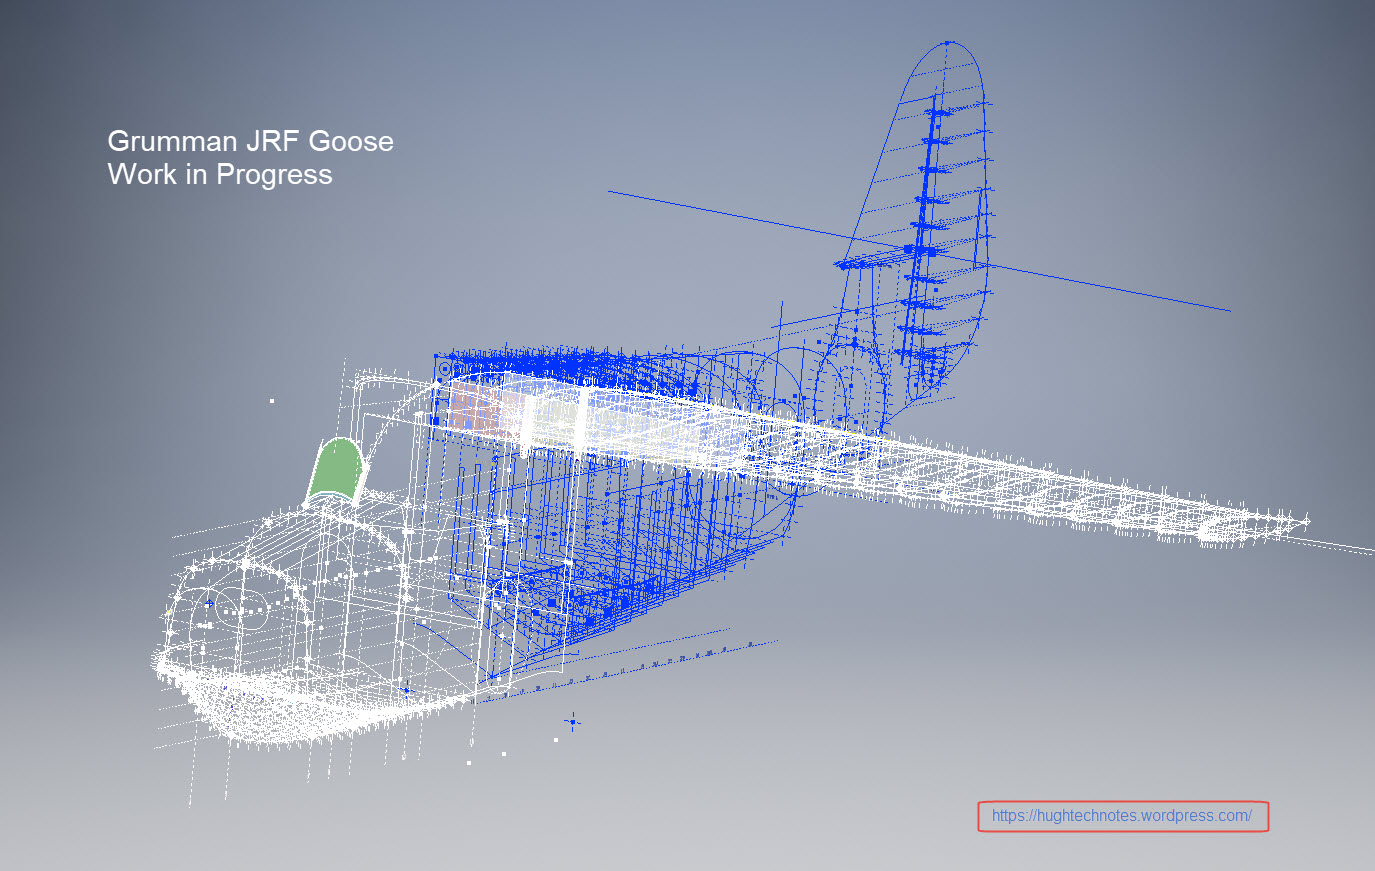
Grumman JRF Goose: New Project
Just started a new project to determine the structure ordinates for the JRF Goose. Typically for the Grumman drawings, this will require resources from a combination of tabled ordinate data and extrapolated dimensions from the individual part drawings.
With the NAA drawings for the B25 Mitchell I was spoiled as these guys tend to love ordinate tables and it is much easier to develop the data spreadsheets whereas the Grumman guys tend to fragment the information over several drawings. The wing ribs, for example, are actually in 3 separate drawings; the nose, intermediate and tail-end.

Why Ordinate datasets are important;
I spend a lot of time developing these datasets as a record of my research that can be utilised for various purposes including development of CAD 2D and 3D models. As an engineer, I know from experience that when the skeletal framework of an aircraft is correct then everything else will fall into place. I often see modellers dive headfirst into creating 3d part models and end up encountering problems with alignment and fits.
It is therefore prudent to first check the geometry prior to committing to 3d modelling…it will save you a lot of time, frustration and work in the long run.
The datasets already completed for the P-51 Mustang and the B25 Mitchell have been used by restoration companies, researchers, modellers and RC enthusiasts. The criteria for each group vary so it makes sense to provide the correct geometry in formats that can be translated to any engineering systems in a manner that can be used according to their specific needs.
The Goose Dataset:
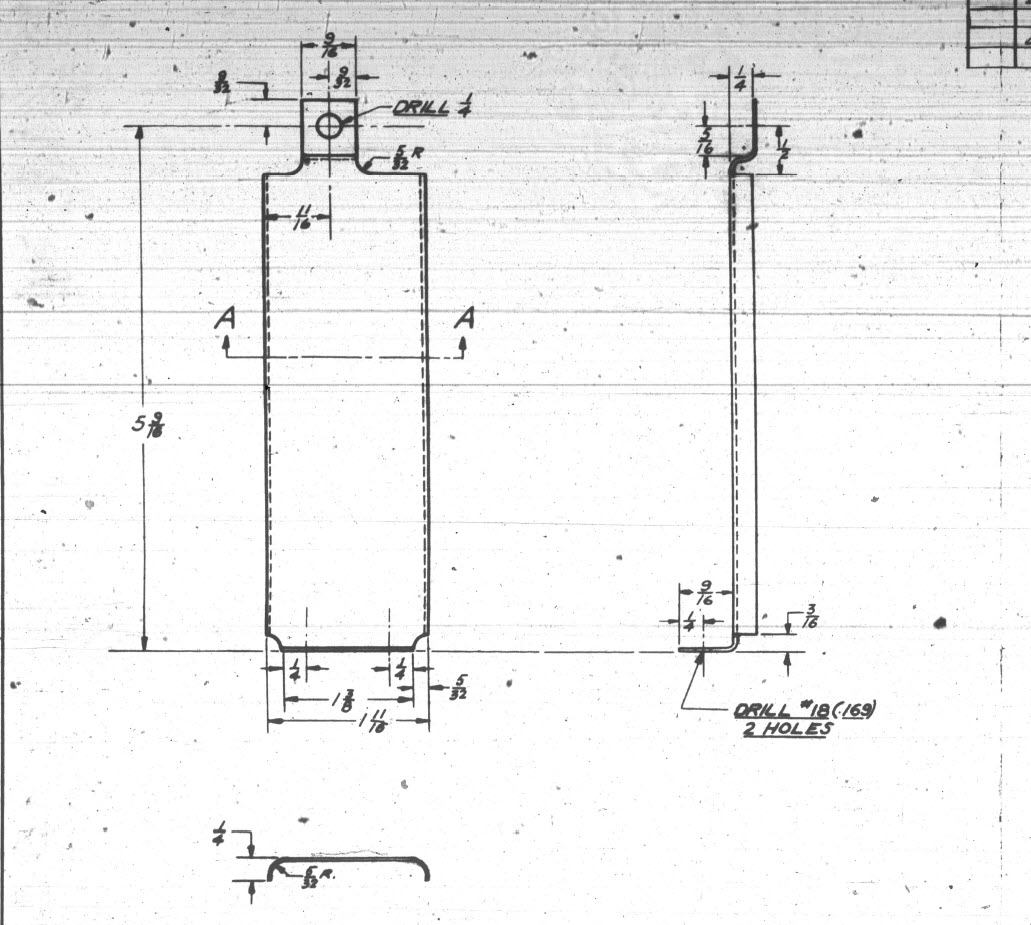
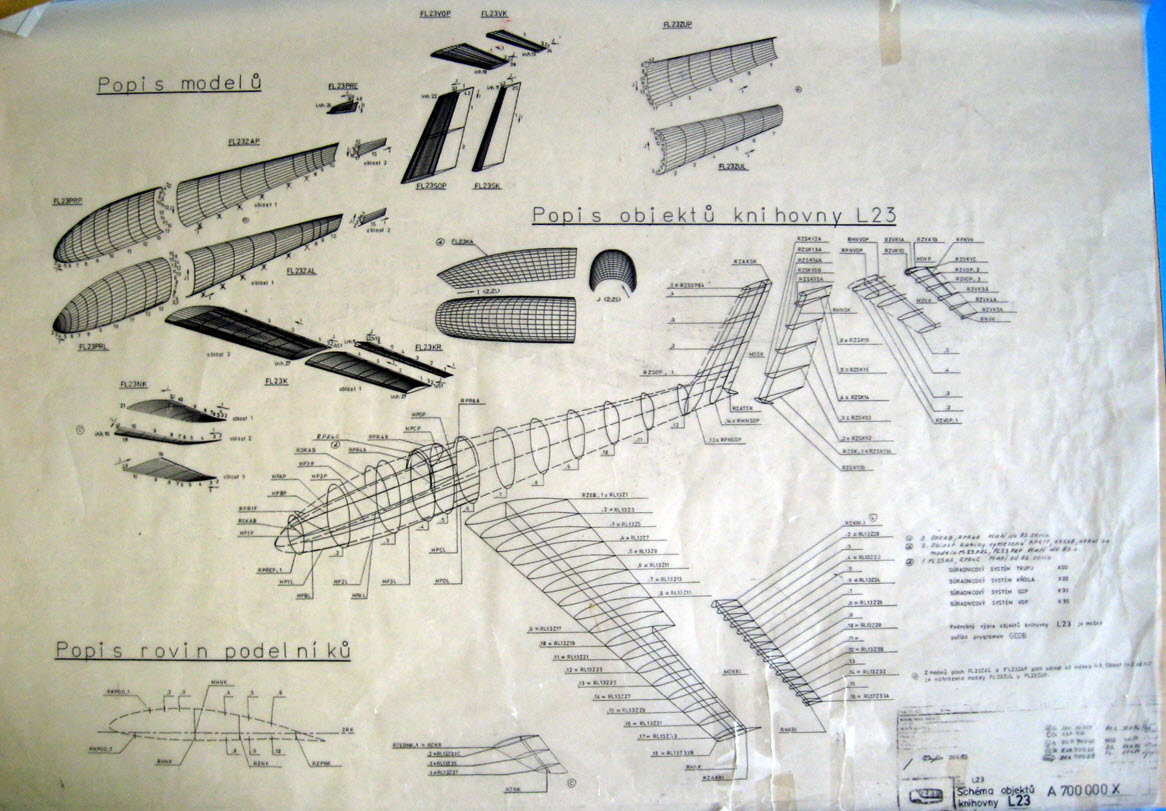
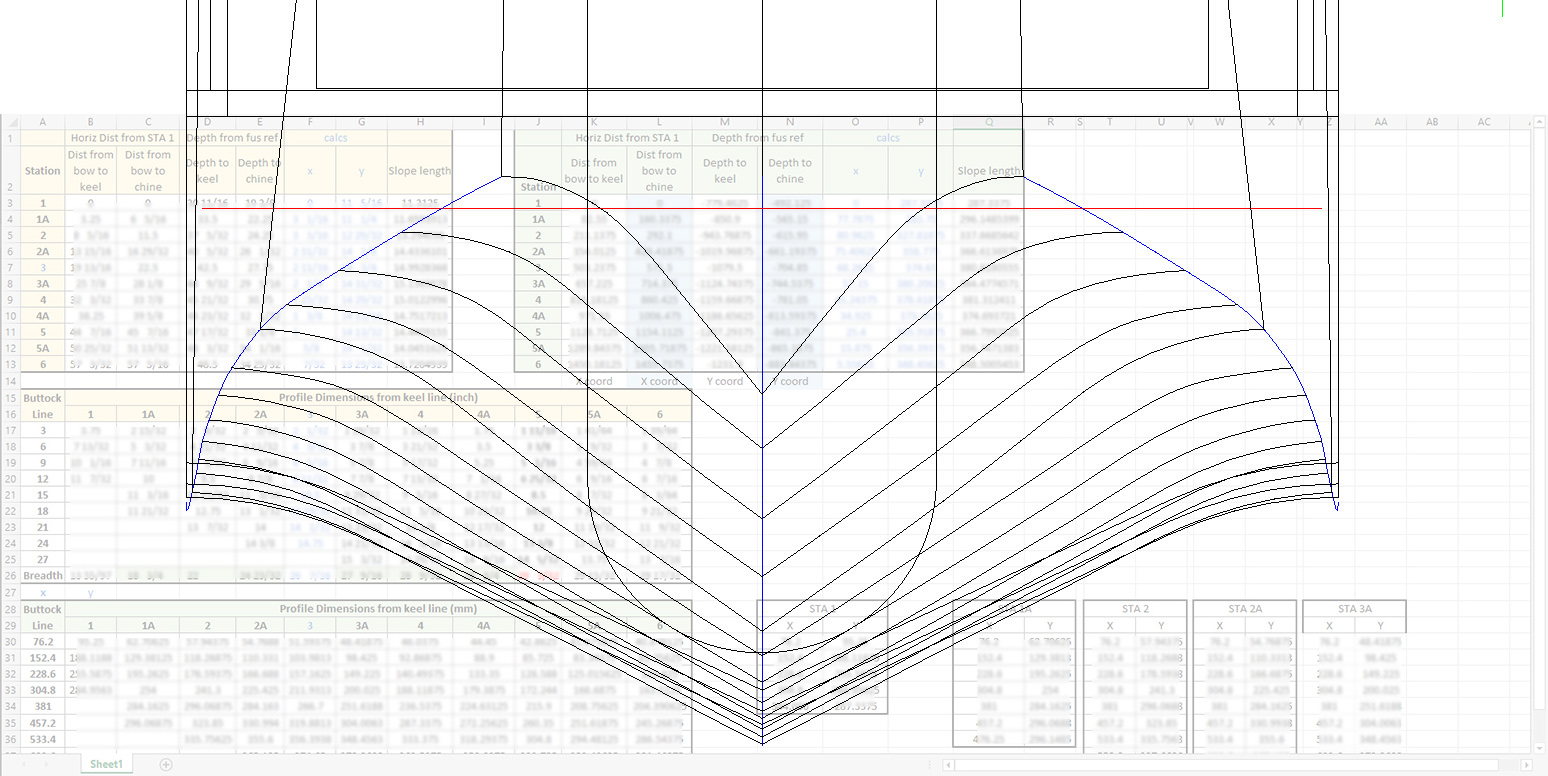
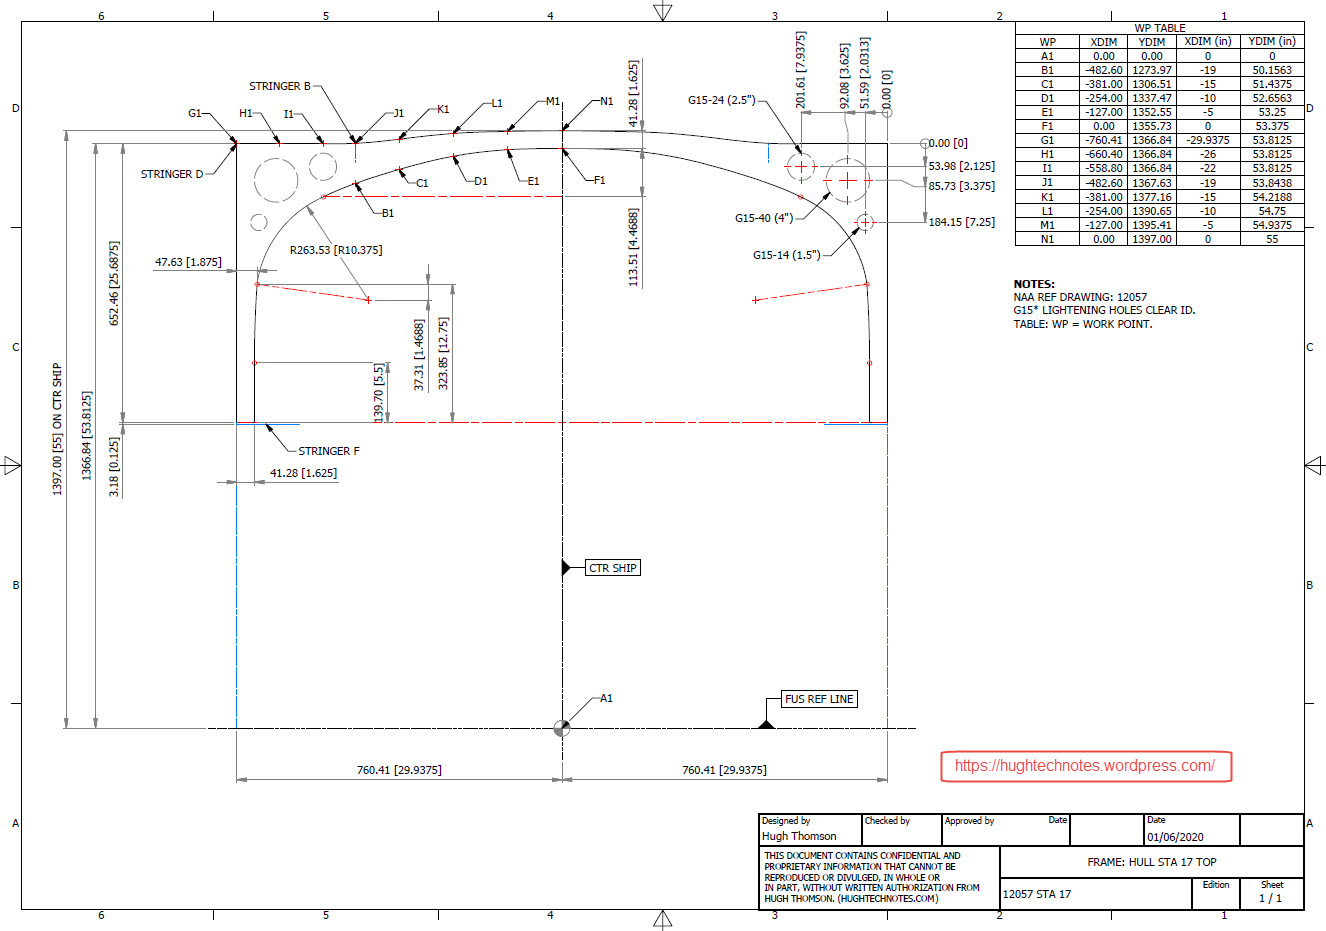
The above cross floor drawing is an example where the ordinates are first compiled in a spreadsheet in both inch and millimetre formats. The core data is then extrapolated to determine the workable X, Y, Z coordinates. This is an interesting aspect of the aircraft design as the cross-floor profiles share similarities with the sister aircraft, the J2F Duck. Where I have cross-references between similar aircraft this information will also be included on the spreadsheet as a record of data resources.

The wings; as mentioned; are compiled from 3 different sections for the nose, intermediate and tail-end which require 3 sets of tables for each rib and then consolidated.
The ribs once integrated into the CAD assembly are then checked at each ordinate point to verify alignment with the neighbouring profiles to ensure accurate alignment. Occasionally the originating data is unclear so it is absolutely essential to continually check neighbouring associations to achieve accuracy.

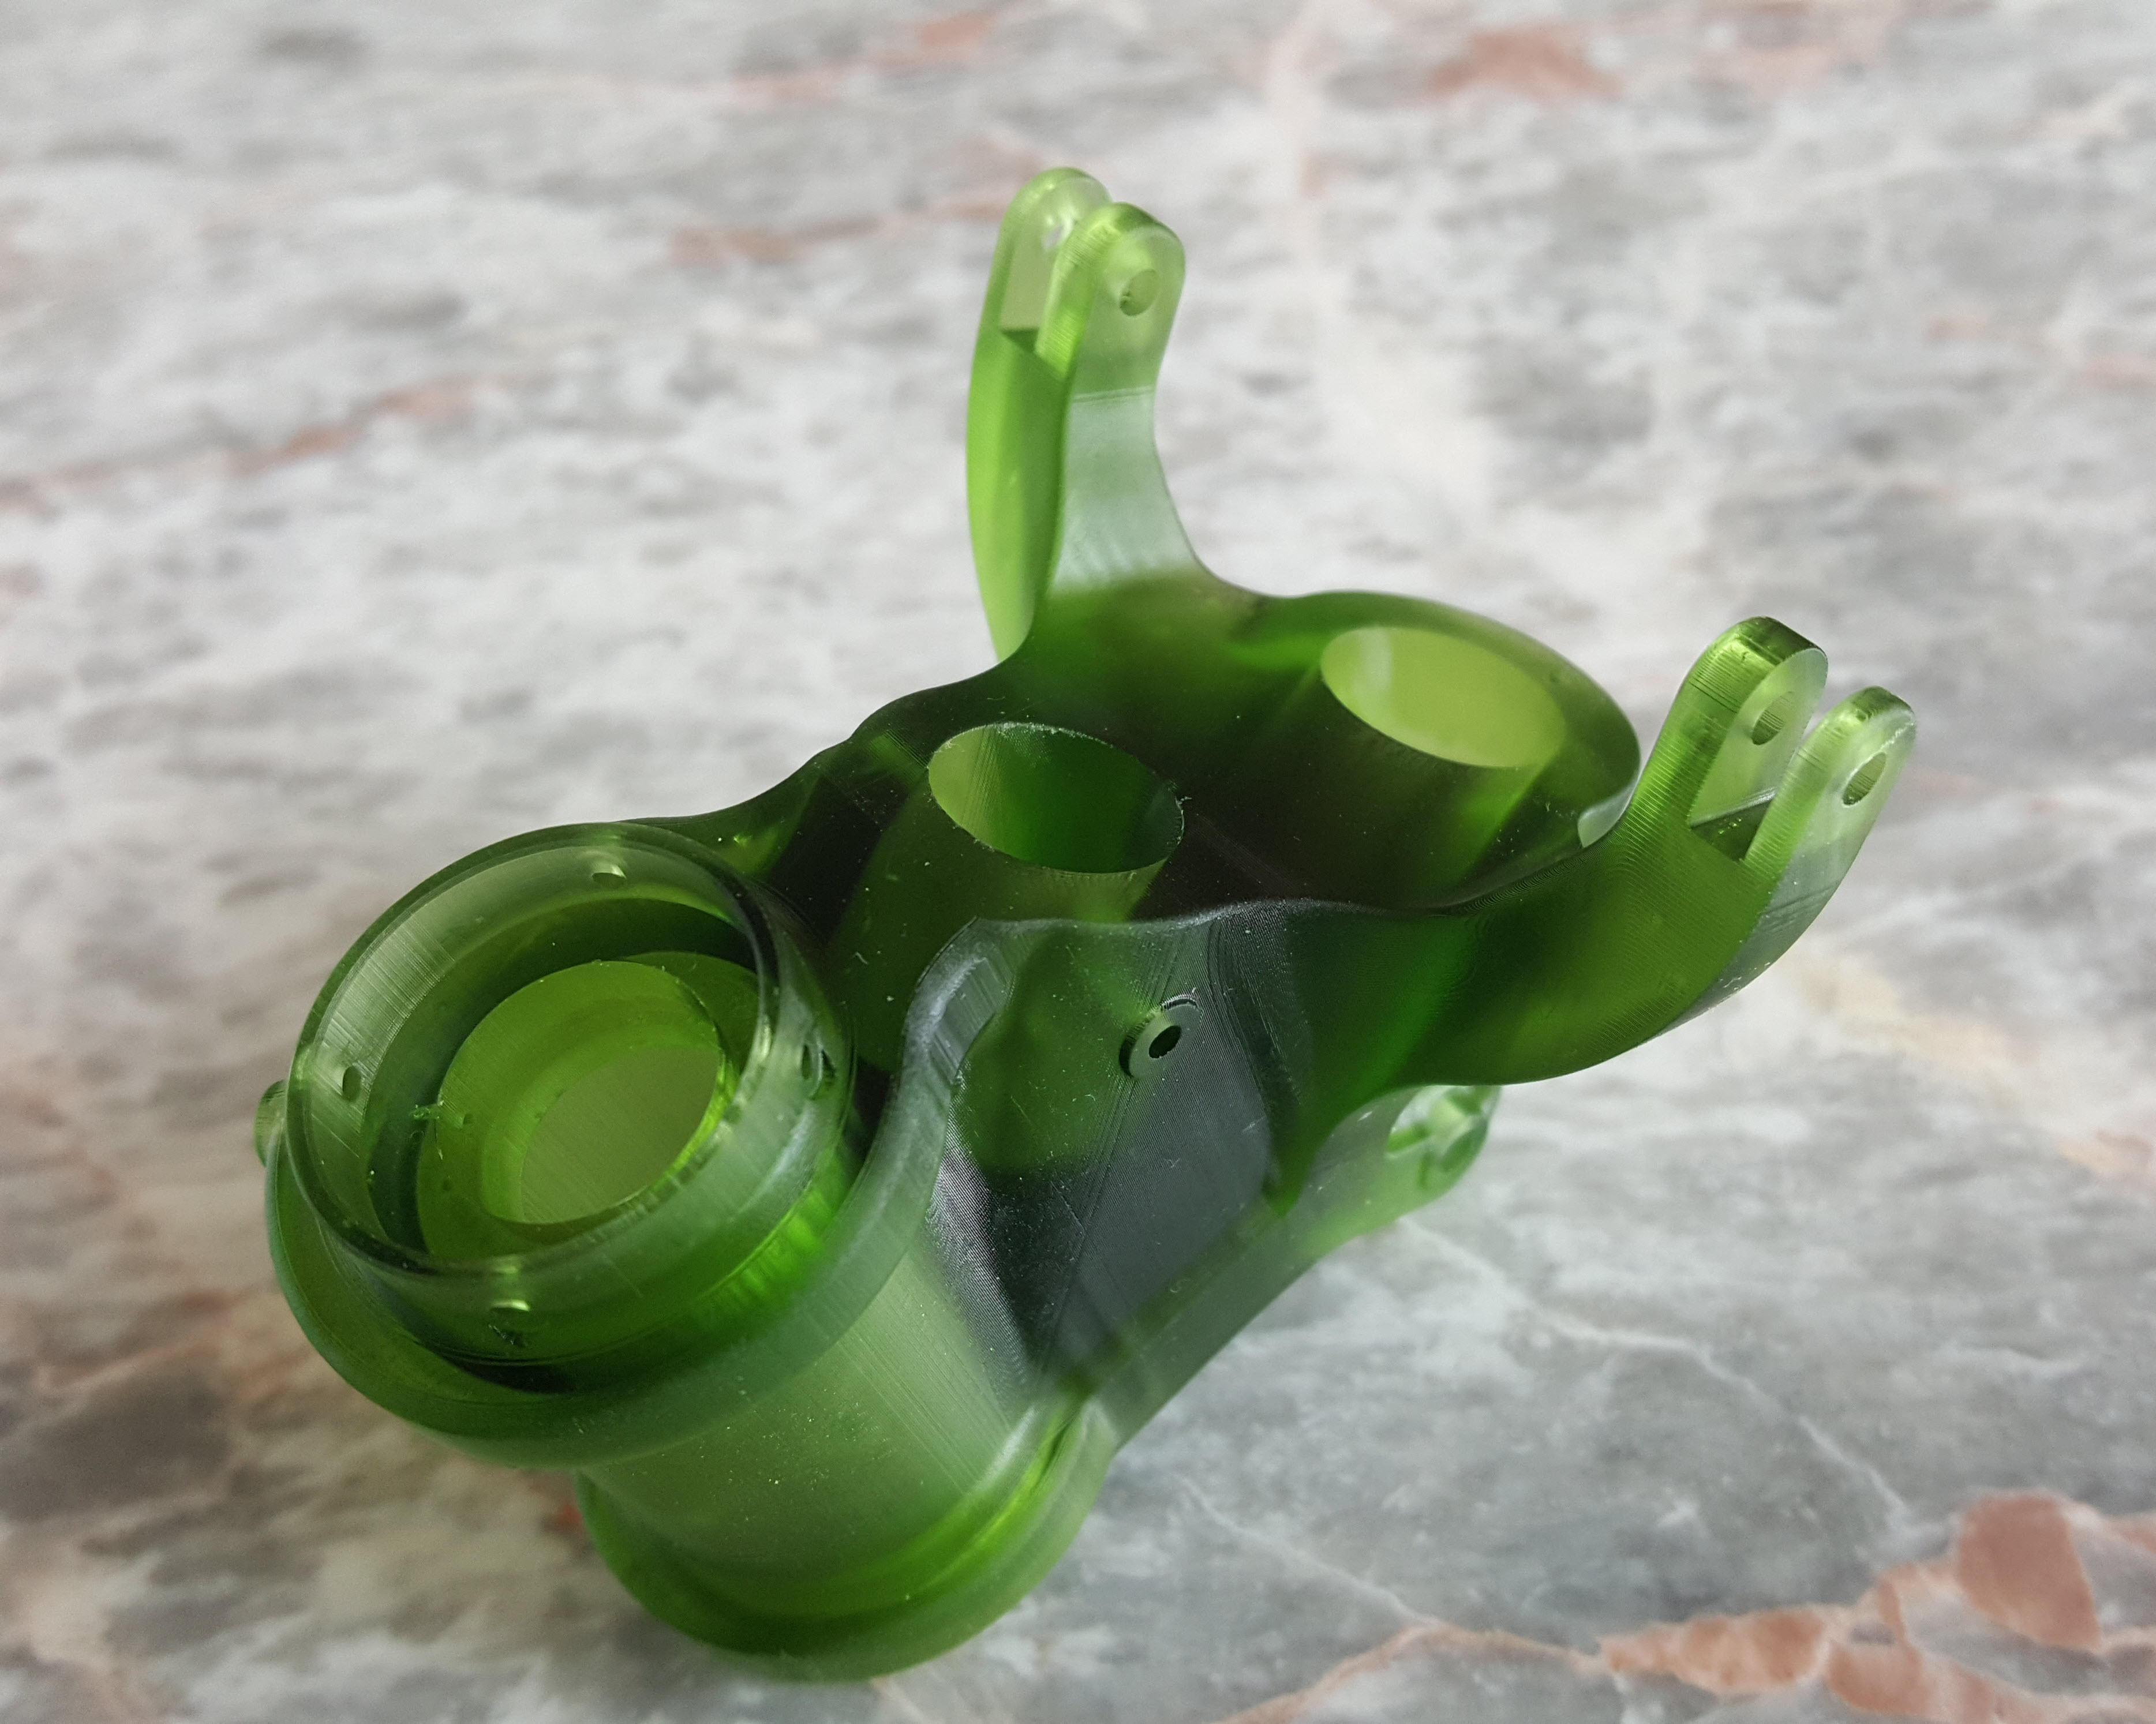
The wing tip float: as well as the float profiles; depicted in the image above; I will also be studying the support structure and relationship with the wing.
This ordinate set will comprise the dimensional data as spreadsheets and as 2d DWG cad profiles for every frame and rib. For the main fuselage, the drawings will contain the key dimensional information in lieu of the usual spreadsheets due to the complexity of the frames. All other areas; wings, cross floor, nacelle and empennage will have both spreadsheet data and drawings.
These datasets are designed to help you get a heads up on your own aviation projects and as a resource for research. I do this work and research so you don’t have to…so please consider supporting my efforts. Thank you.
Update 3rd June 2020:
Have been quite busy figuring out the vagaries of working with the Grumman drawings. They are generally quite good but to be honest the inclusion of a few more ref dimensions would not go amiss! The development of the tail fin and rudder required referencing 3 separate drawings in order to ascertain the correct relationships between the fuselage, tail fin and rudder.
I also noticed a number of incorrect dimensions during the development of the fuselage and tail. When this happens it is imperative to cross-reference various associated drawings and sometimes even the Structural manual to determine correctness. This is actually where a lot of time is consumed in sorting these issues.
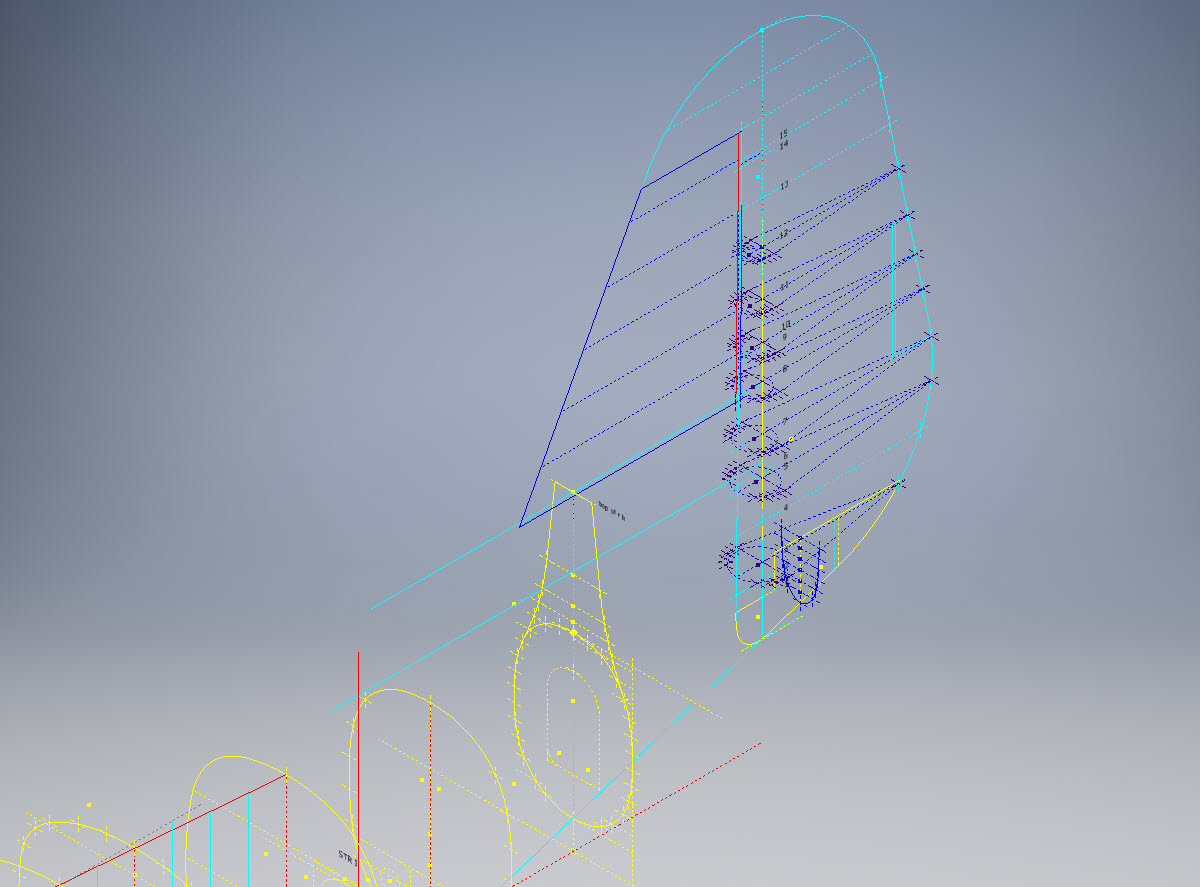
For the wing the ordinates are being checked as the profiles are developed. Part of this process involves developing key structural components as 3d models to ensure that the profile ordinates align correctly. In the following image it shows that the ordinates points align as expected with the red points (intermediate wing section) on the aft of the front beam web and the yellow wing nose points fall on the forward face.

I am not planning to fully model this aircraft only where necessary to investigate alignments.
TechTip: It can be frustrating working with Grumman drawings…take nothing for granted. The wing ribs as mentioned comprise 3 drawings, the Nose, Box Section and Intermediate. For the sake of complicity I shall refer to them as Nose, Mid and Rear.
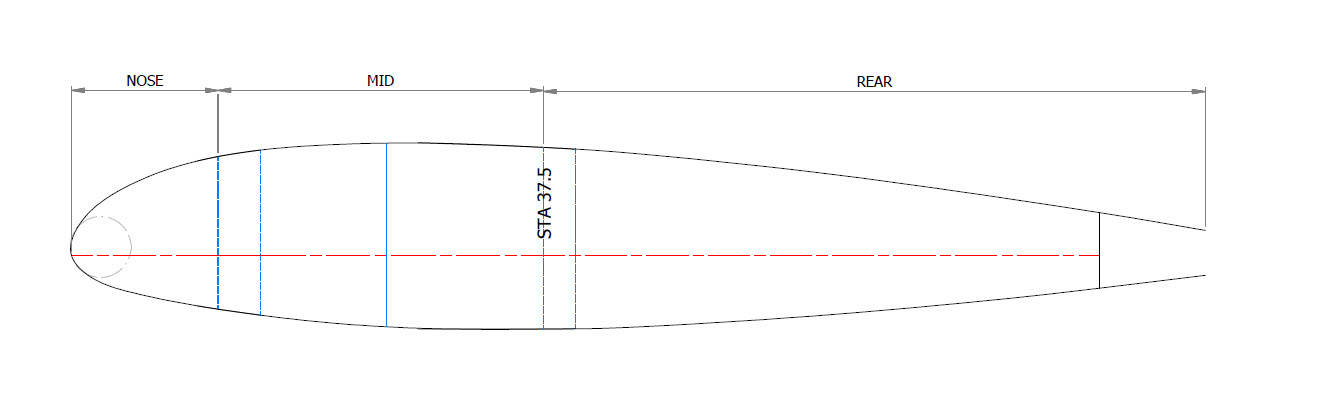
One would assume a certain degree of consistency particularly when the detail drawings relate to Station locations. For example: you would expect the STA 37.5 would be a location that would be consistent for the mid and rear sections…but it is not. For the Rear section it refers to the back face of the rear beam and for the Mid section it refers to the front face of the rear beam. So when aligning the various actions it is imperative that the connecting line is either of the chord stations on either side of STA 37.5 (ie STA 40) and not STA 37.5. It is easier for the Nose and Mid Sections as they both have ref dimensions to the common STA 25, however the rear section does not reference chord STA 25.
Seriously a few additional reference dimensions consistently applied would make working with these drawings a lot easier.
I carried out a dimensional study on the spreadsheet data to check the relationships between chord STA, 30, 37.5 and 40. It revealed a number of inconsistencies in the STA dimensions but we did have consistency with the offsets at STA 30 and 37.5 (highlight red).

I would expect that the dimensions from STA 30 and 40 would be consistent with no variation as noted on the Mid and the Rear rib profiles…however that is not always the case. Out of all the ribs only 4 were what I would envisage as being correct. This requires further in-depth analysis to determine the best solution.
This will be a lot of work but a clear example why it is important to record the data in spreadsheets so an analysis like this can be done.
Update 14th June 2020:
Fuselage Frames, Tail Fin and Rudder now complete. Horizontal Stabiliser, Stringers, Flaps and Ailerons, Nacelle and revised wings still to do.
This will be the full package, spreadsheets and drawings. The latter will be all the frames and ribs at 1:1 in Autocad DWG format as well as the full 3d model.
 I seriously think this will make a great foundation for an RC model at whatever scale you desire.
Update 2oth June 2020:
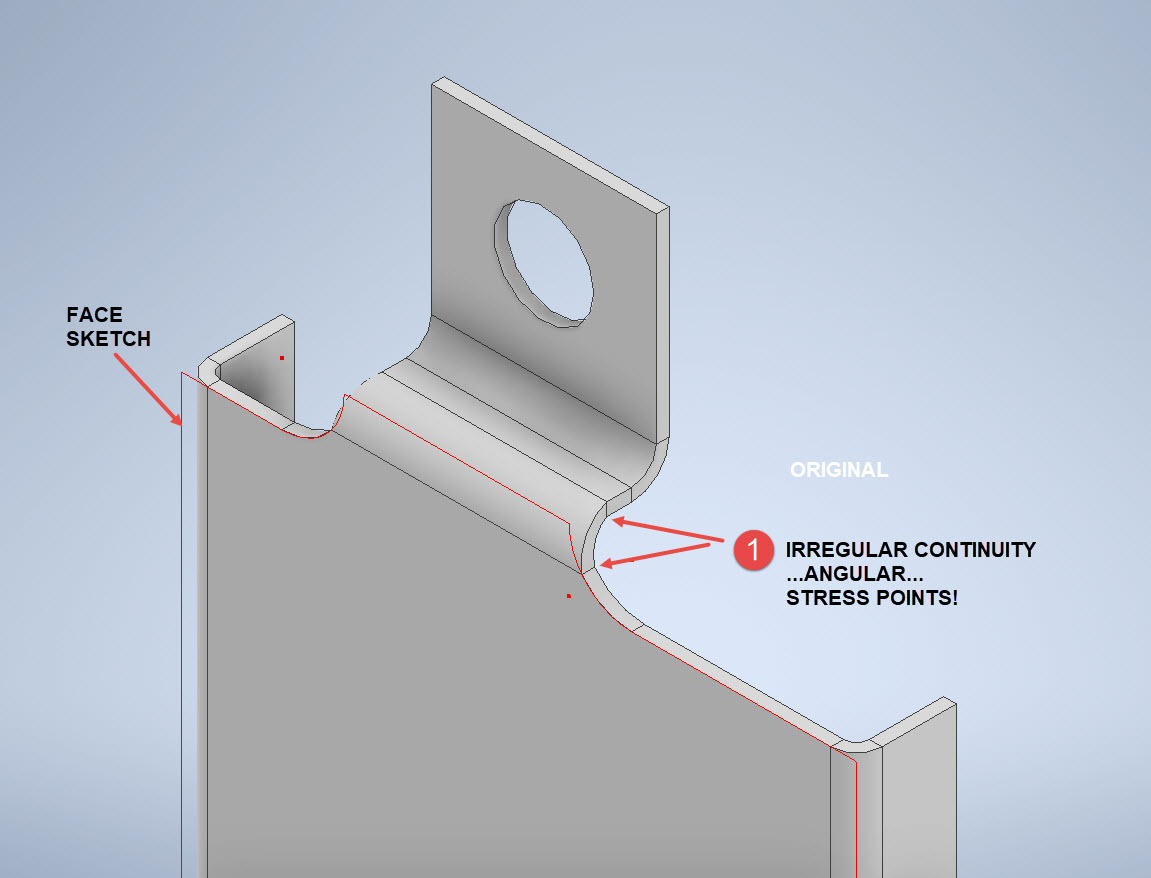
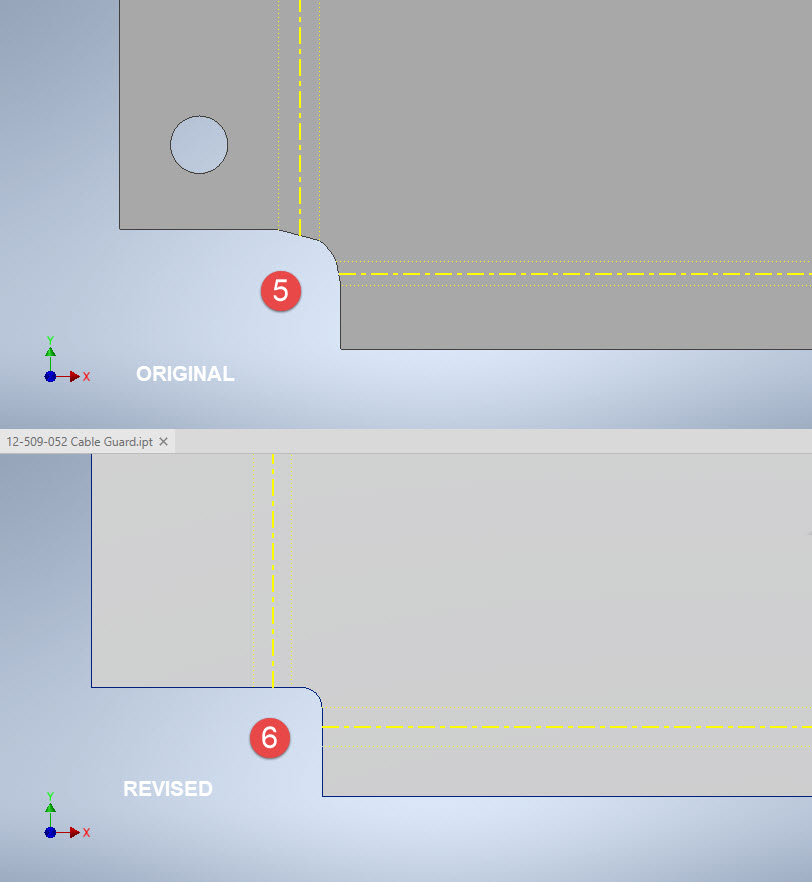
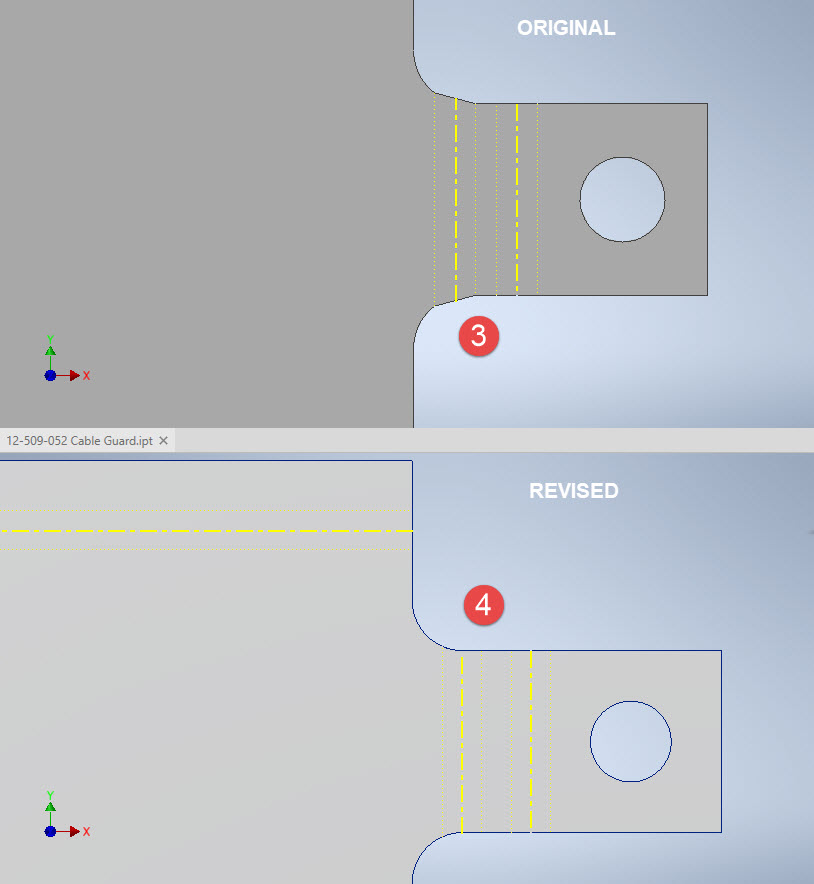
With reference to the Techtip above I have revised the wing layout to correct identified anomalies with the Grumman wing rib drawings.

I first established 5 ribs that are deemed to be correct, setup a work plane at Chord STA 40 and checked the relationship with the established ribs. For reference I initiated 4 axis selected from 4 known points on the ribs. I then placed the Rib at STA 271 to act as a check. The ordinate points on the profile for this rib is within 0.04mm of the projected axis and the dimensional offset from the work plane is only 0.025mm.
Having now established correct alignments I will introduce each of the remaining ribs, then check dimensions for each one with the work plane and each of the 4 axis. The end result will be a dimensionally accurate wing.